21 May 2012
by seasonalhome
in Wedding! (Bridal Shower too)
Tags: Budget Decorations, Budget Wedding, ceremony, Decor, Decorate, Decorations, home, marriage, Outdoor, renewal, tying the knot, vow, Wedding, weddings
June is still the most popular month for weddings, so I thought now would be a good time to share this idea, as inspiration for anyone with a super-tight wedding budget.
A friend of mine was making plans to renew her wedding vows. She envisioned the ceremony taking place, under the vine-covered arbor, in the back yard of another friend and asked for my help dressing it up.

She was definitely on a tight budget (ahhhh… I love a challenge!), so we assessed what each of us already had to use and what else might be needed to turn the arbor into a sanctuary for their ceremony. One friend had a white, paper aisle runner (from her own wedding), a pedestal table (to hold the ceremony items), and I had a few white paper bells. Also, I went by a warehouse store (COSTCO) to purchase one of their fabulous 50-yard rolls of wired ribbon and we were set!
I cut the aisle runner to hang one-half on the front & the other half on the back (of the arbor). Next, I made several bows for accenting the white paper runner and paper bells and Viola’! A backyard ceremony site was set. Simple and beautiful!


I used the leftover scraps of ribbon to create rose petals, placed them in the skirt of a piece of statuary (I found in the yard) and then moved it near the walkway/aisle – instant flower girl! 😉

Sometimes, I wish more couples would consider holding their weddings at home. There’s no pressure, no rules… just love and togetherness. Oh, and the final total to ready the arbor (for the wedding ceremony) was merely the price of the ribbon $8! I think the next photo demonstrates the grace that was bestowed on my friend and her hubby that day. Congrats to them both for a long, wonderful marriage together, with wishes for many more years of wedded bliss!

Enjoy the creativity!
Eileen
20 May 2011
by seasonalhome
in Wedding! (Bridal Shower too)
Tags: Reception, Wedding, Wedding Box, Wedding Cash Box, Wedding Gift Box, Wedding Gift Card Box, Wedding GIft Card Holder, Wedding gifts, Wedding Money Box, Wedding Reception, Wedding Reception Box, Wedding Reception Gift Box
If you’ve ever shopped for a pretty box to use at a wedding reception, for holding cards with cash & gift cards inside, you’ll notice that most of them open quite easily.

Leaving the box exactly the way it came, when placing it on a table at the reception location, simply creates a dangerous temptation to peek inside. I’ve heard terrible stories where complete strangers, who happened to be walking through the reception site, have emptied these boxes.
Recently, my friend’s son was getting married and she also realized the potential danger of leaving this box open and unattended at the reception, so I offered to help resolve it. Together, we found a satin ribbon that matched the bridal colors and a self-adhesive initial that represented the bridal couple’s married (last) name. While the box was closed, I used my low melt hot glue gun to attach a pre-measured, length of ribbon around the entire circumference of the box, making sure it covered the seam of the box opening. Then, I simply added the self-adhesive initial to the front. Now, the box was secure and when the happy couple was ready to look at their cards, all they had to do was remove the ribbon! And just look at how much prettier the decorated version looked, on the reception table:

20 May 2011
by seasonalhome
in FAMILY FUN, GIFT BASKET IDEAS, Wedding! (Bridal Shower too)
Tags: Wedding, wedding gift, Wedding Idea

See the WEDDINGS Category for details about the Wedding Gift Box, pictured on the right of the gift basket
This year, I attended a wonderful wedding and as expected, the gifts (guests brought for the Bride & Groom) were all beautifully wrapped, in a sea of silvers, golds and white on the reception table.


Click on any Photo, for a larger view
But, there was one gift that caught everyone’s attention. It was SO unique , not only in its color and gift wrap, but also in its contents. It was brought from Holland by the Dutch relatives of the Groom’s Mother. 🙂 Before these relatives traveled from Holland to attend the wedding, they purchased and then, stuffed their suitcases with every possible Dutch product they could fit in. The gift basket overflowed with all of their thoughtful goodies… things like a clock and cups, with the traditional Dutch Delft pattern on them. But, there were also many traditional Dutch treats (cheeses, chocolates, tea and crackers, etc.) that the Groom was familiar with because his mother made sure he was continually aware of his heritage, while growing up.
I was fortunate enough to be a small part of the gift when the Mother of the Groom asked me to put the finishing (gift wrap) touches on her family’s gift by arranging it in the basket, wrapping it up and making a gift tag and bow to add. I remember thinking what a great idea this gift was because it not only pleased the Groom, but also provided him with everything he needed to share the story of his heritage and childhood traditions with his new wife. So, if your family consists of relatives from another country (either in this generation or one in the past), keep this idea in mind when someone in your family gets married. Consider the idea of beginning a new tradition by giving them their “Heritage” as a wedding gift. It will be remembered for many more years than a blender, I promise you!

26 Apr 2011
by seasonalhome
in Wedding! (Bridal Shower too)
Tags: royal wedding party idea

If you need a fun idea to help you recover from the post-Easter blues, consider getting up early (east U.S. coast) or going to bed late (west U.S. coast), etc. so you can enjoy celebrating the Royal couple’s big day – Friday, April 29th, beginning at 4:00 a.m. EST. If you don’t have time to join them on their big day because of work commitments, consider recording the event to view at a more convenient time. Whenever you’re ready….
 enjoy the festivities along with a cup of tea and one of the best scone recipes: http://allrecipes.com//Recipe/worlds-best-scones-from-scotland-to-the-savoy-to-the-us/Detail.aspx
 You might even want your own souvenir – a replica of the royal engagement ring – available at Michael’s craft stores for around $6 (with a 40% off coupon): http://www.michaels.com/Bead-Landing%E2%84%A2-Princess-Ring/bd0929,default,pd.html?cgid=products&start=1

You can enjoy the festivities, on your own in your fuzzy slippers, or invite a few friends to join you. If that sounds like fun, here is a free ROYAL PARTY INVITATION template you can download: http://www.bettycrocker.com/sitecore/shell/controls/rich%20text%20editor/~/media/Files/PDF/RoyalWedding_Invite.ashx
For a change, something happy is in the news, so enjoy the pomp & circumstance and feel free to celebrate with the happy couple. Congratulations William & Kate!
∞
Thoroughly enjoyed the “Royal Wedding Viewing” party this morning (except for the 4:00 a.m. start, of course – LOL)

In keeping with my motto of “celebrating on a budget”, the souvenirs for our Royal Wedding Viewing Party totaled only $5. The cup was $1 and the sticker (of the royal couple) was made and printed from a computer, the Crown ornament and soap were both found at Michael’s Craft Store for $1 each and the cookies were made by a local baker for $1 each also. I think the ornament, especially, will be a fun reminder when hung on my tree, once Christmas arrives!

28 Sep 2010
by seasonalhome
in BABY STUFF, FAMILY FUN, Wedding! (Bridal Shower too)

My table o' goodies I bring to share with the many "eager-to-learn" moms at my presentations.
For the past 10 years, I’ve been speaking to groups about creating traditions with their families and friends and have thoroughly enjoyed meeting so many wonderful and involved Moms along the way! I am truly amazed and thrilled to find that today’s parents still manage to find time to care so much about making memories, despite their incredibly busy lives. It makes me very happy for their lucky children and I happily share my own creative ideas with them.
At this week’s presentation, to another awesome group of Moms, I kicked off the very first ANNIVERSARY SALE of my book. The response was so wonderful, that I have decided to extend that SALE to the rest of my friends, followers and readers. 
So, pull out your gift list to consider who, on it, would enjoy receiving a unique and creative gift, like my book (Creative Family Traditions and Ideas). Coming up with 4 people you need gifts for should be easy AND by doing so… you will get YOUR BOOK FOR FREE!!! Why? My ANNIVERSARY SALE is: Buy 4, Get 1 FREE!!!!Enjoy the sale, while it lasts….
Consider my book as a
Holiday or Everyday Gift for:
- Mom-friends
- Sisters
- Sister-in-Laws
- Expecting Parents
- New Parents (GREAT Starter Idea Book!)
- Baby Shower Gift
- Cousins
- Aunts
- Nieces
- Pre-School and Elementary Teachers
- Co-Worker Parents
- Neighbor Moms
A recent review of my book:
As my kids are getting older, I have been trying to come up with other fun and memorable traditions without much luck because I am simply not that creative. Thankfully, Eileen Bickerstaff has come to my rescue with her book, “Creative Family Traditions & Ideas.” It is literally packed with ideas for every occasion including birthdays, Easter, Summertime, Halloween, Christmas and so many that I can’t even begin to list it all.
The photos are fantastic….there is a “Spooky Halloween” dinner picture that is so beautiful and inspiring that I am already beginning to plan our own surprise dinner for the kids on Halloween night. They will LOVE it. As a mom on a budget, I especially appreciated that many of the decorations used in the picture are actually from discount stores so it won’t cost a lot of money. The author really focuses on fun and appealing ideas that are inexpensive without compromising on taste.
With the holidays approaching I can’t wait to get inspired even more by all of the Christmas ideas from “Lighting the Path” to the “Holiday Chore Exchange.” The author even has a website where you can view sample content from the book and listen to a You Tube Video to learn more about the meaning behind the book and get even more ideas.
Before we know it our children will be grown and starting families of their own. Wouldn’t it be really neat to have your very own special family traditions? If you need a little help with ideas don’t hesitate and purchase “Creative Family Traditions and Ideas” by Eileen Bickerstaff and get started making memories today!
16 Aug 2010
by seasonalhome
in Birthdays, GRADUATION IDEAS, MOTHER'S & FATHER'S DAY, Wedding! (Bridal Shower too)
Tags: Birthday, family traditions, FATHER'S DAY, Gift, graduation, Mother's Day, Tradition, Unique gift wrap, Wedding

I cannot tell you how many times I’ve presented gifts, to friends and family, using this method. I thought of it when my boys were teenagers and have used it for “event” birthdays (like this 60th birthday celebration – see photos below), Baby and Bridal Showers, Graduations, Mother’s or Father’s Day and Holidays. Whenever I feel like showering someone with a little fun and happiness, I fill up an umbrella with goodies they love. My brother loves Starbucks coffee and scratch-off lottery tickets, so I filled his umbrella with $25 worth. He LOVED it!!!! It’s so funny to watch their expression when they think you have bought them JUST an umbrella…… and THEN….. they open it up and are thrilled beyond words!
The assembly details and suggestions are in my book (CLICK on book icon, in right column, to order) as well as TONS of other fun ways to celebrate the Events, Birthdays, Seasons and Holidays of our lives. Best of all…. they’re road tested! Making memories is SOOO important. If you (or someone in your life) need ideas, they will LOVE my book… gift them!
By the way, this time, I added a new twist to my gift umbrella. I placed it in a cardboard tube (left over from the inside of a roll of wrapping paper) and then, wrapped the cardboard tube with bright birthday paper & curling ribbon. I thought it would be fun for it to resemble an English Christmas Cracker – except mine is a Birthday Cracker, loaded with prizes! Check out the fun he had ~


05 Jul 2010
by seasonalhome
in Birthdays, MOTHER'S & FATHER'S DAY, SPRING!, VALENTINE'S Day, Wedding! (Bridal Shower too)
Tags: Bridal Shower, Bridal Shower Gift, Bridal Shower Gift Idea, Bridal Shower Goodie Bag, Favor, Gift, Guest Gift, Party Favor
[check out my other helpful, creative ideas… under the categories, listed on the right-hand side of this page →]
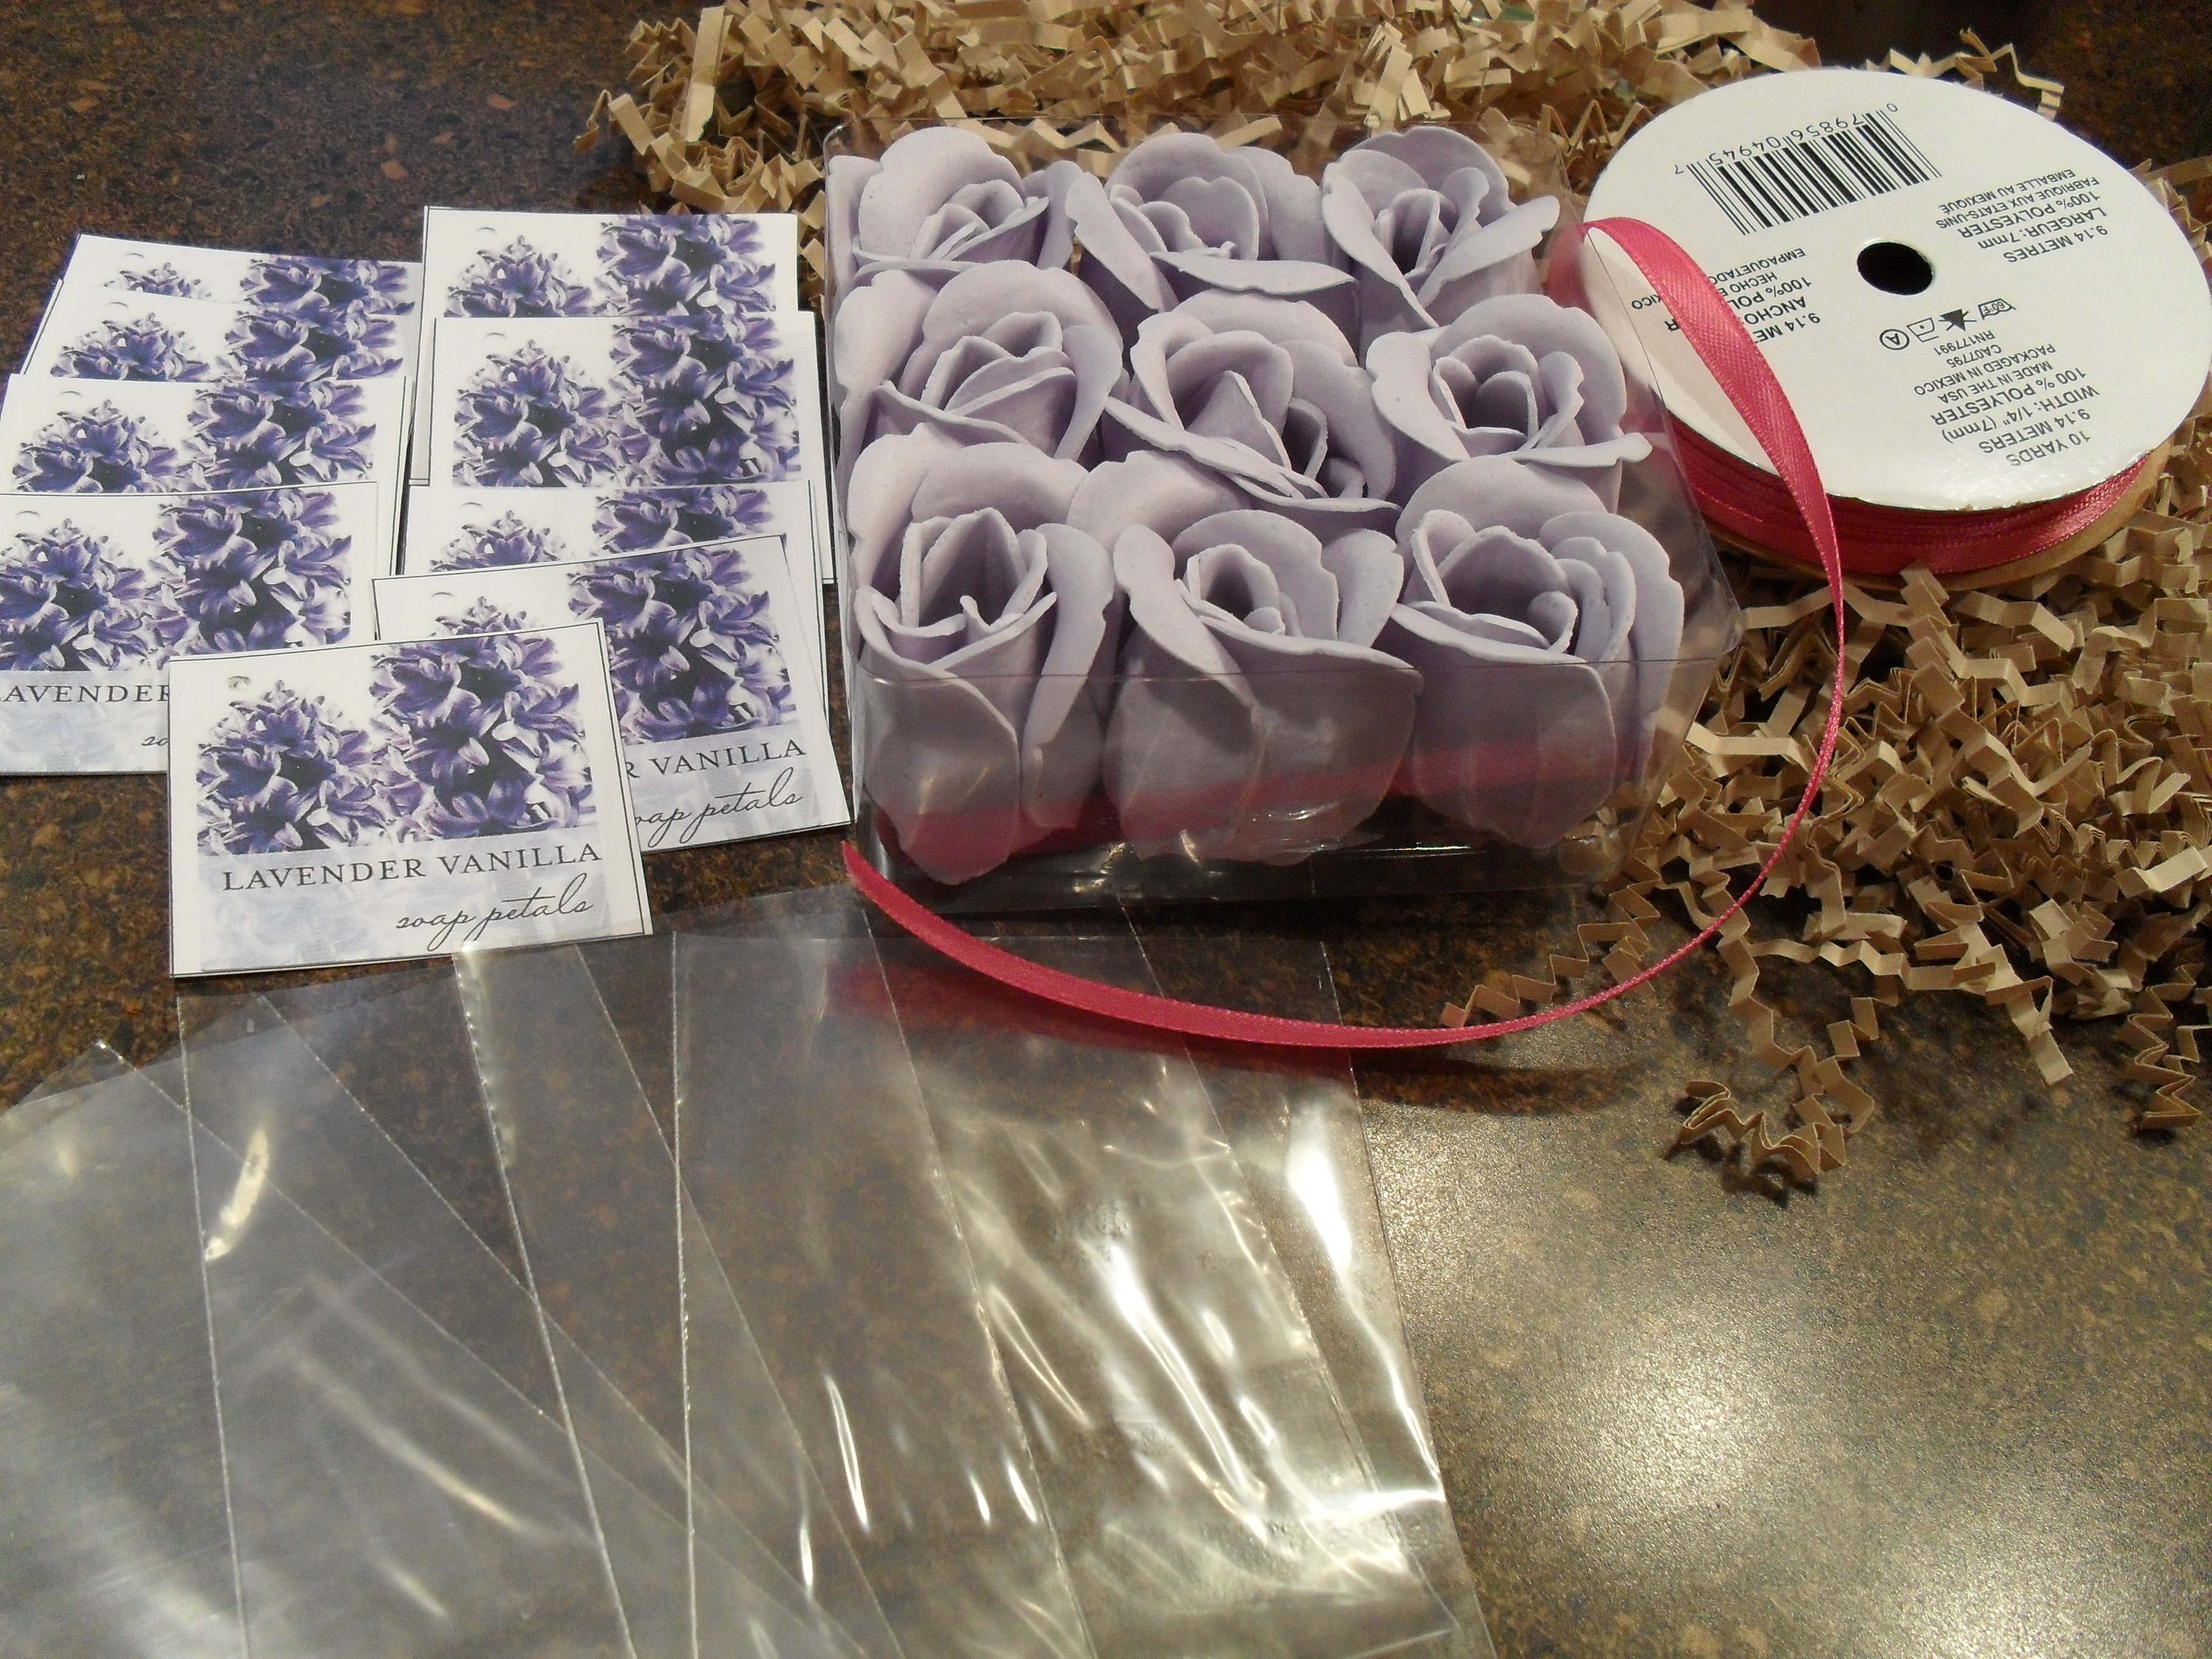
Recently, I was looking for something inexpensive that would make a nice, little party favor. What I came up with would also make a great bridal shower guest gift.
I found this box of these rose-shaped soaps [each petal is a piece of soap] at a Michael’s Craft Store. The cost? Are you sitting down? ONE DOLLAR!!! That bargain price left me with extra funds to purchase a package of tiny, open-ended plastic bags (apx. $2) and a roll of thin satin ribbon ($1.00). The box of 9 rosebud soaps had only 1 tag attached, describing their scent (lavender) on 1 side and instructions (for use) on the other side. Since my plan was to create 9 individual gifts out of my economical find, I needed to create 8 more labels to attach to each soap rosebud.

To accomplish this, I scanned both sides of the label into my computer. Next, I created a 9-cell “table” in Microsoft Word. Into each cell, I inserted the .jpg I created by scanning the front of the label. I repeated this process and inserted the “instructions” instead. I, then, printed the front “table”, flipped over that printed paper and placed it back into the printer. Then, I printed the instructions, which ended up on the back (of the original printout). I’m a little technologically challenged, so I had to print it out a few times (front & back), hold it up to the light to see where lining-up adjustments should be made until I finally got it right. In the end, it printed out a grid of 9 tags that looked exactly like the original! Now, all I had to do was cut them apart and punch a hole in each so I could thread a length of satin ribbon through it and tie in a bow to close up each baggie with a rosebud in it.


For the event, I displayed them together on a silver platter, on a table located by the front door so each guest could take one on their way out the door. It was a big hit with the party-goers because most of them had never seen rosebud-shaped soap before and the beautiful, yet simple packaging made it seem like a very special gift… and an economical gift for me. A win-win!!!

05 Jul 2010
by seasonalhome
in Birthdays, FATHER'S DAY, GRADUATION IDEAS, MOTHER'S & FATHER'S DAY, Wedding! (Bridal Shower too)
Tags: Birthday, Gift, Gift Wrap, Gift Wrap Idea, shower gift, Unique gift wrap, wedding gift
[check out my other ideas under the categories, listed on the right →]
If you would like to try a unique idea for wrapping a gift, here’s one…
This idea is especially helpful when you are short on time and find that you only have a small amount left of your favorite gift wraps. It also falls under the “waste not, want not” category in life! In this case, my favorite plain white paper came up a little short (on the ends of my gift) AND I only had a small amount of my other favorite black & white toile paper left. So, it occurred to me that I should combine the 2 papers and unify them through my ribbon choice. Here is the end result, which was a TRUE attention getter at the birthday party I took it to!

Simply use double-sided scotch tape to adhere side pieces of gift wrap
13 May 2009
by seasonalhome
in Birthdays, FATHER'S DAY, GRADUATION IDEAS, MOTHER'S & FATHER'S DAY, Wedding! (Bridal Shower too)
Tags: 16th Birthday, 21st Birthday, Birthday, Birthday Gift, Birthday Ideas, Birthdays, Bridal Shower Gift Idea, Creative gift wrap, Dad, Dad gift, Dad's Day, FATHER'S DAY, Father's Day Gift, Father's Day Gift Idea, Gift, Gift for Graduate, Gift Idea, Gift Wrap, Grad, Grad gift, Grad Ideas, Graduate, Graduation Gift, Graduation Idea, Man Ideas, present, Unique gift wrap


This is one of the most popular and only one of the creative traditions in my book.
I don’t know too many Dads who wouldn’t enjoy receiving this for Father’s Day or even Graduates, someone with a BIG approaching birthday (#16, #21, #30, #40, etc.), a Baby or Bridal Shower! Whatever occasion you choose to do this for, keep in mind that it’s even better when you add a little humor to the gift!
First, purchase an inexpensive umbrella (Dollar Tree). Cut varying lengths of curling ribbon equal (in number) to the amount of items you will be placing inside the umbrella. Using double-sided tape, attach either money (21 – $1 bills for 21st birthday or16 – $1 bills for birthday #16), gift cards(i.e. favorite lunch spots, coffee shop, D.I.Y. store, where he buys his CDs or DVDs, movie rental store, gas card, etc.) or the most economical choice: simple, handwritten or printed certificates (“This is good for one…hug, car wash, hour of uninterrupted T.V.viewing time, etc.”), one to the end of each piece of ribbon. Tie the other end of each piece of ribbon to the inside frame of the umbrella, spreading them around as evenly as possible. Turn the umbrella upside down and hand place each ribbon/gift inside and carefully close the umbrella. Gift wrap the umbrella (click here for a gift wrap suggestion).
Now comes the FUN part: when Dad (or any gift recipient) opens his gift, imagine his surprise when he finds a simple umbrella inside. Then, imagine his further surprise when you suggest that he open it “to make sure it works properly because you purchased it from the Dollar Tree” (indicating, of course, that you aren’t too sure about the quality). O.k., now he’s thinking your gift is not only odd, but also CHEAP! As in any good tale, however, the ending is a happy one when Dad opens his umbrella ‘o gifts and is showered with ribbons of goodies he can enjoy.
BONUS IDEA:This also makes a great gift for birthdays (esp. for teens), high school or college graduations, weddings, baby or bridal showers (as a group gift), etc. Reactions may vary, but it is always hilarious!
SECRET AGENT 00-DAD
Just prior to Christmas, every year, my husband and I along with our grown children set aside a day to be together and grab a little adventure that none of us have ever experienced before. We call it our “Family Fun Day” and it’s just one of the ways we stay close. With that in mind, I came up with this Father’s Day gift idea.
As I thought back over the past few years of our adventures (photos below), I realized that we did a lot of very macho activities… simply perfect for a Secret Agent Father’s Day! Your mission(should you decide to accept it) will involve setting up appointments at 2 or 3 local Adventure facilities and scheduling them to begin in the morning and progress through the day. Below are a few potential ideas that may inspire an idea or two:

Adventure #1: a 5 minute helicopter ride

Adventure #2: five laps in a real race car at a REAL race car speed!

Adventure #3: five minutes in a simulated skydive (Design/Image/Idea copyrighted by Creative Family Traditions. All rights reserved.)
Other ideas for adventures you may have in your area:
- Discovery flight (at a local Executive Airport)—fly both an airplane and helicopter
- Parasailing
- Fly in an open cockpit bi-plane (available at some regional airports)
- Hang gliding
- Glider ride
- Zip Line (this eco adventure is popping up everywhere these days)
By the end of his adventures, Dad should feel as though he just experienced a day in the life of a Secret Agent (on a much tighter budget, of course; apx. cost for 3 ideas shown – $185)! And since gift stores usually carry a wide variety of frames, finding the perfect one to display Dad’s memorable photos in should be a cinch!

2 Themed Gift Wrap Ideas
GIFT WRAP IDEA #1: Cut a large triangle (almost equal in length to the height of your gift bag) out of a piece of white Foamie or plain, white card stock paper. Also cut a bow tie and 3 button shapes out of a sheet of black Foamie or plain, black card stock. Glue to the front of a black gift bag for your 00-Dad gift. Gift suggestion: a watch, with a ton of special functions, for your Secret Agent Dad!!
GIFT WRAP IDEA #2: Glue a photo of Dad enjoying his favorite hobby to the back of a paper frame (found in the Scrapbook Dept. of stores). Optional: adhere a Personal (self-adhesive) message to the top and bottom of the frame (messages & alpha letters also in Scrapbook Dept.). Glue framed photo to the front of Dad’s gift bag for the perfect, personalized gift wrap!

BONUS IDEA!!! If you like my idea of a Family Fun Day (around the holidays), you may also want to use that day as a photo “op” for your Christmas or New Year Greeting Card. It’s easy to create on your computer and then you have a unique e-Card to email to family and friends. Talk about saving money (postage, paper, etc.) in a tight economy! As a sample, below are a couple of my own from previous years. You may notice that my e-Cards are “New Year’s” Greetings. That’s the price you pay when you own a holiday design firm ~ no time to send out anything during Christmas! :-)) The neat thing I have learned, however, about sending out a New Year’s greeting is that everyone has finally slowed down, so your greeting is more memorable! And as you can see (below), keeping your greeting light-hearted (by making sure it reflects something funny) will have your family & friends looking forward to receiving it each and every year!

Turning your greeting into a jpeg will make it easy to attach to your e-mail

In this greeting, I simply couldn’t overlook all the sunglasses, so we called ourselves the “Swamp Mafia” 🙂

Our 2010 Adventure – Horseback Riding!
05 May 2009
by seasonalhome
in Wedding! (Bridal Shower too)
Tags: Camera, Gift, Photos, Reception, Reception Idea, Wedding, Wedding Guests, Wedding Idea, Wedding Photos
One of the most fun items to provide for your wedding guests is a disposable camera. It provides them with a vehicle to participate in the fun of capturing the candid moments and special memories of your wedding ceremony and reception.
Your choices, in the marketplace, are typically “plain” disposable cameras that have a wedding graphic on them or to purchase expensive “personalized” versions from a catalog or wedding supplier. When I saw the personalized versions from a catalog, I realized how easy it would be to replicate these. And the wonderful benefit to making your own camera covers is that you can purchase inexpensive disposable cameras that, in the end, will look like they came from an exclusive catalog. Below are the camera covers I designed for my niece’s wedding. Designing her camera covers enabled me to completely customize them for her special day.
They chose a destination wedding on an island, so I simply found appropriate clip art and inserted text boxes over it to personalize the covers with their names, wedding date and my original poetry, in their honor.
My original poetry:
We’re happy you joined us for some waves, sun and sand,
and if you see something memorable on either ship or land
please use this camera to capture the moment for us
whether pre or post wedding, we won’t fuss!
Love, Lisa and Todd
I, then, printed these in sets of 4 onto medium-weight card stock paper (available at any office supply store). Once you purchase a disposable camera, simply remove the cover it comes with and use it as your template to create a personalized version. Design your cover, print it, cut it out (including the holes for the lens) and wrap the cover around the camera, using a glue stick to seal one end over the other.
Here is a closeup view of a single camera cover:

Design/Image/Idea copyrighted by Creative Family Traditions. All rights reserved.

- Printing 4 camera covers on 1 page saves paper! 🙂
If you are enjoying my creative ideas, please feel free to check out my (als0) creative book “Creative Family Traditions and Ideas”. It’s available for preview and purchase on my website: www.CreativeFamilyTraditions.com. Check it out… you’ll LOVE the SAMPLE VIDEO! 🙂
To view more ideas, click on ABOUT THE AUTHOR (above) and ENJOY!
Previous Older Entries