
I found a great product, just arriving in The Dollar Tree stores, that won’t last! And if you don’t think you need them, you may change your mind when you check out the suggestions I have for their use!
What is it? Large bamboo poles (apx. 5 ft. tall x 1″ – 2″ in diameter). Although they vary slightly, in height & diameter, I found most of them to be fairly large. Typically, bamboo poles cost $5-$7 each in DIY, craft or floral supply stores and make great decorative accents. At this price ($1.00), they are very affordable and will provide inexpensive inspiration for you!
Here’s what they look like (in the store) to make it easier for you to spot them, or when asking your local Dollar Tree staff where to find them. I found them hovering between the (teeny) craft section and toy dept.

Distance photo (for size scale)

By the way, I didn’t see this item on their website, so it is probably an “in-store” item only.
The first (and easiest!) suggestion I have for you is to place a few inside a large planter, vase or pot to use as a trending, contemporary and nearly care-free decoration (just a little dusting once in a while). It would look great inside OR (because they’re weatherproof) outside, as seen in one of the photos below:

Consider a greenery base to avoid dust inside the container

The perfect accent with the current, popular trend of Asian decor

Add lighting (in container) for a super-contemporary look

Because they are weatherproof, they make the perfect outdoor accent
Another great idea is to use them to create your own fencing. There are tons of DIY instructions for many versions of this type of project (on the internet),
from easy to complex!


You could also use them as inexpensive curtain rods, “as-is”, spray painted or bundled!

photo courtesy of The Gardener’s Cottage.
For a thicker rod, bundle several together & use 2 pre-made finials or unique wine bottle stoppers as finials
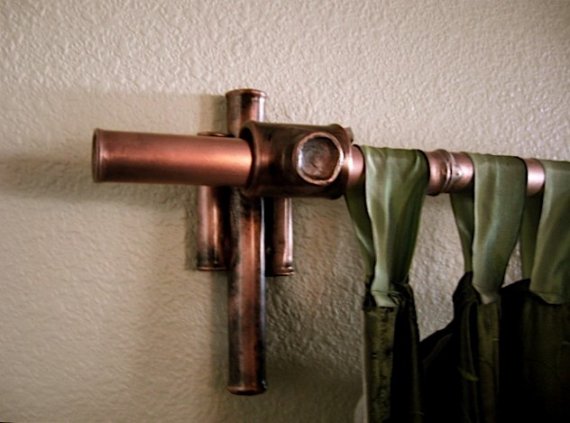
photo courtesy of etsy shop “Copper Bamboo”
And if you’re handy enough to hang a couple of rod holders on the wall, you could use them as a shower curtain rod in a tropical-themed bathroom:

Create your own floor lamp! Or cut smaller pieces for a table lamp.

Or how about an accent to a wedding reception centerpiece?

Need something sturdy to help you support your garden greens?

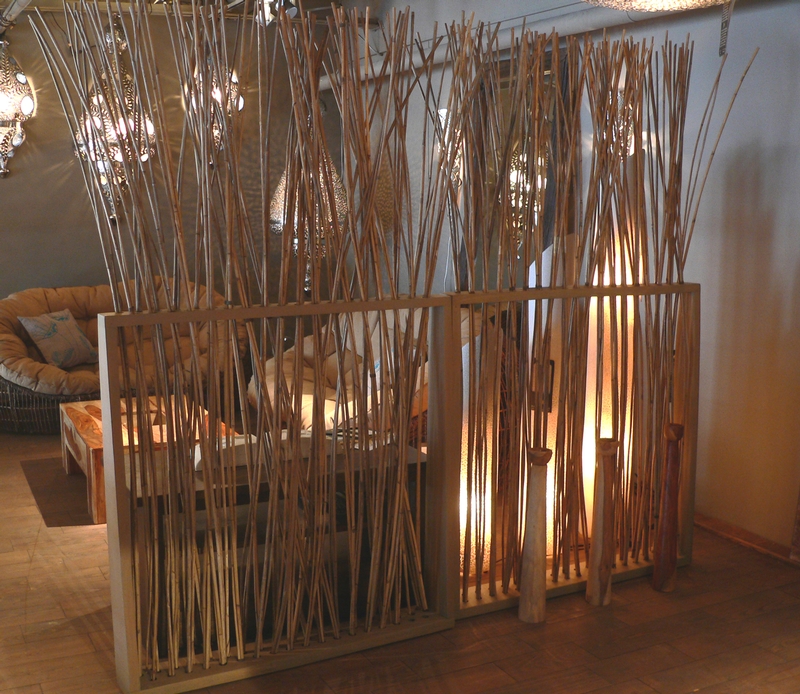
How about making a DIY frame to hold bamboo creating an inexpensive Privacy Screen… inside OR outside your home?
Adding some lighting creates even more ambiance!
OR, do you need a privacy screen from the “Sun”? Then, use them to create a cover for your pergola.

photo courtesy of Beautiful Bamboo Blogspot
Ok, as long as we’re talking back yard, HERE’S a project for ya! Buy a bunch to create your own Tiki Bar. LOL 😉

I absolutely LOVE how great they look glued to the back OR front of a mirror to create inexpensive wall art!
[clicking on either of the next 2 photos will open a separate internet window with each of these creative blogger’s free tutorials]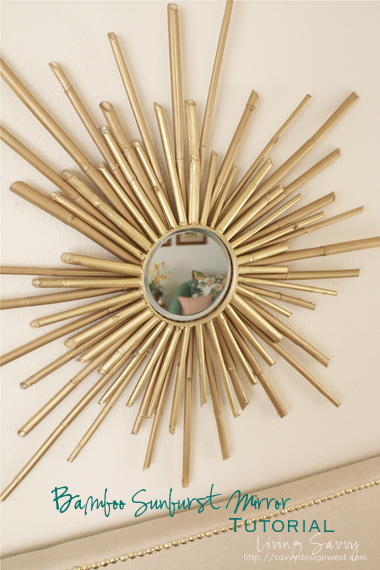
photo courtesy of Savvydesignwest.com
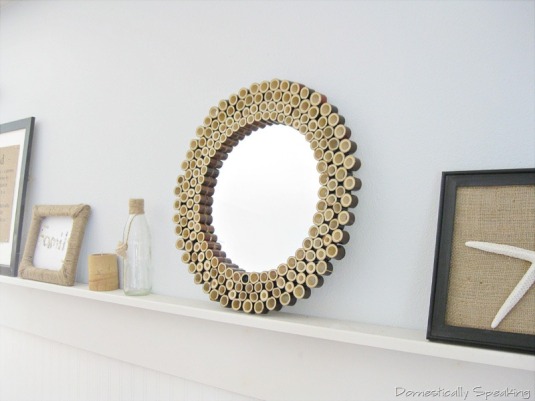
photo courtesy of Domestically Speaking blog
And, of course, my favorite…. as part of a fountain… ahhhh serenity!

photo courtesy of Saaffect.wordpress blog


