I found a great product, just arriving in The Dollar Tree stores, that won’t last! And if you don’t think you need them, you may change your mind when you check out the suggestions I have for their use!
What is it? Large bamboo poles (apx. 5 ft. tall x 1″ – 2″ in diameter). Although they vary slightly, in height & diameter, I found most of them to be fairly large. Typically, bamboo poles cost $5-$7 each in DIY, craft or floral supply stores and make great decorative accents. At this price ($1.00), they are very affordable and will provide inexpensive inspiration for you!
Here’s what they look like (in the store) to make it easier for you to spot them, or when asking your local Dollar Tree staff where to find them. I found them hovering between the (teeny) craft section and toy dept.
Distance photo (for size scale)
By the way, I didn’t see this item on their website, so it is probably an “in-store” item only.
The first (and easiest!) suggestion I have for you is to place a few inside a large planter, vase or pot to use as a trending, contemporary and nearly care-free decoration (just a little dusting once in a while). It would look great inside OR (because they’re weatherproof) outside, as seen in one of the photos below:
Consider a greenery base to avoid dust inside the container
The perfect accent with the current, popular trend of Asian decor
Add lighting (in container) for a super-contemporary look
Because they are weatherproof, they make the perfect outdoor accent
Another great idea is to use them to create your own fencing. There are tons of DIY instructions for many versions of this type of project (on the internet),
from easy to complex!
You could also use them as inexpensive curtain rods, “as-is”, spray painted or bundled!
photo courtesy of The Gardener’s Cottage. For a thicker rod, bundle several together & use 2 pre-made finials or unique wine bottle stoppers as finials
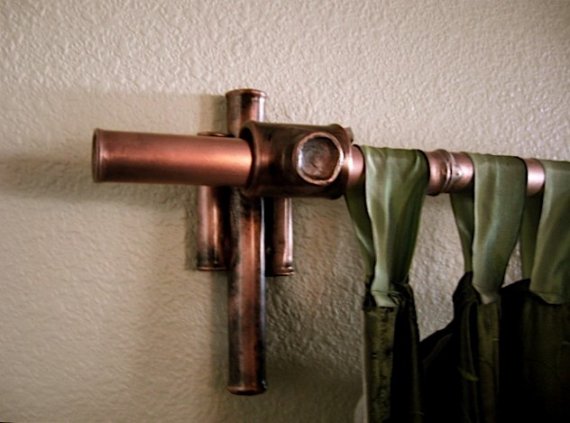
photo courtesy of etsy shop “Copper Bamboo”
And if you’re handy enough to hang a couple of rod holders on the wall, you could use them as a shower curtain rod in a tropical-themed bathroom:
Create your own floor lamp! Or cut smaller pieces for a table lamp.
Or how about an accent to a wedding reception centerpiece?
Need something sturdy to help you support your garden greens?
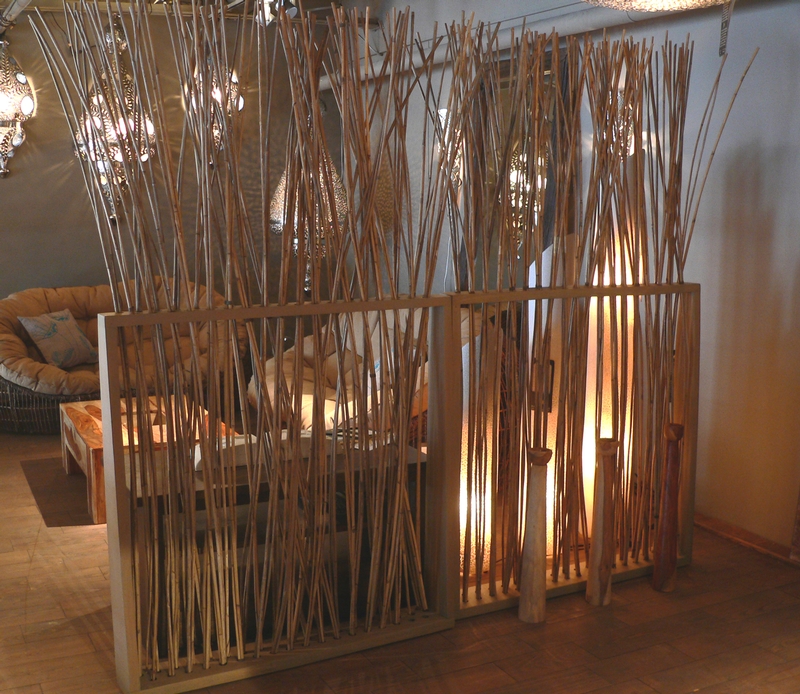
How about making a DIY frame to hold bamboo creating an inexpensive Privacy Screen… inside OR outside your home?
Adding some lighting creates even more ambiance!
OR, do you need a privacy screen from the “Sun”? Then, use them to create a cover for your pergola.
photo courtesy of Beautiful Bamboo Blogspot
Ok, as long as we’re talking back yard, HERE’S a project for ya! Buy a bunch to create your own Tiki Bar. LOL 😉
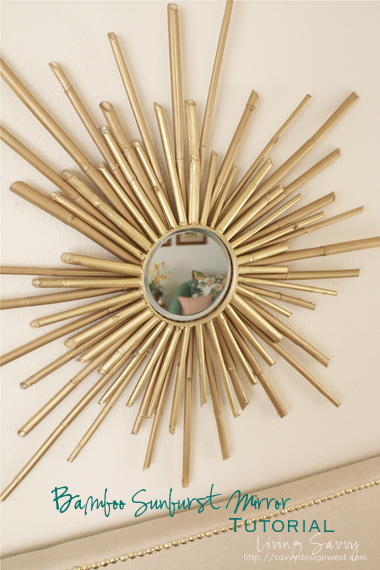
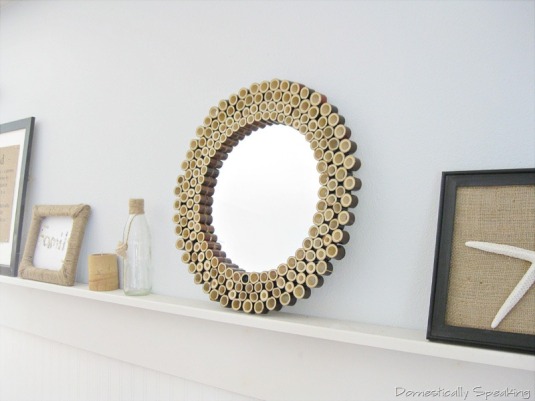
I absolutely LOVE how great they look glued to the back OR front of a mirror to create inexpensive wall art!
[clicking on either of the next 2 photos will open a separate internet window with each of these creative blogger’s free tutorials]
photo courtesy of Savvydesignwest.com
photo courtesy of Domestically Speaking blog
And, of course, my favorite…. as part of a fountain… ahhhh serenity!
Our 2012 Holiday Home Musical Video is ready to provide you with some inspirational holiday spirit!
Click below, to view:
If you’d like to watch it in HIGH DEFINITION QUALITY, click on the “GEAR” icon (this will appear in the black bar once you hit the PLAY button) and then, click on 720p.
Don’t forget to turn up your speakers, fix a cup of cocoa, put your feet up to…
Enjoy the Creativity!
MERRY CHRISTMAS
Eileen
♥ My sincerest thanks to the talented Production Staff at THEM FEELINGS MULTIMEDIA for creating our video each & every year, simply to support a small business! ♥
[As always, click on any photo to enjoy a larger view]
Christmas decorating at The Seasonal Home had to go in a slightly different direction for 2012, thanks to the addition of a new family member. Meet Miss Lilly Grace, who sometimes looks more like a Teddy Bear…
She’s a very sweet girl who didn’t mind posing for her holiday photo…
And just this week, those cute little puppy ears turned upward (to help her listen for Santa!) and I think she looks more like a fox…
Whatever our little girl turns out to be, because she can get into things (as most puppies do), I had to out-fox her by creating some clever holiday decor. So, if you have a new, young one around this Christmas, whether on 2 or 4 legs, I hope my ideas help you out too! Also in this blog post, you’ll find unique & budget-friendly decorating ideas as well as DIY tutorials, so make yourself a cup of cocoa and enjoy the creativity!
THE FRONT PORCH
Because I created such a large display last year (click HERE to review), I chose to keep things simple outside, utilizing my trusty footed urns (you’ve seen these before! lol) again to hold natural, preserved wreaths, with a large red ornament in the middle of each. The berry garland is actually 3 separate (4-foot) pieces. HELPFUL HINT:attaching several smaller (less expensive) lengths together is easier than trying to find one, (expensive) long berry garland:
I found myself in a “Holly and Berries” mood, this year and it began with my outdoor bench. HELPFUL HINTS: Don’t hesitate to decorate outdoor furniture with garland (adding lights too!) because it welcomes your guests with the “unexpected”. And the mossy gift (on the bench seat) is simply a white box that I covered in moss, using glue… easy!
I love my Goat Cart! And it turned out to be a great investment because it holds larger decorations, for every season! Also, I’ve used it in my garden, yard and now, on my front porch. How versatile is that?!! 🙂
The final front porch touch is an old sled I display every year (found years ago, at a local yard sale… in FLORIDA, no less! lol). I usually add a “PLEASE SNOW” sign to it, but I think I’ve finally given up on that dream and added holly, berries and a skate to it instead. In Florida, we CAN do ice! 😉
THE FOYER
The Holly and Berries snuck right in the front door and laid out beautifully in the Foyer also…. welcoming Christmas, with a little help from Santa, of course!
And here’s where the “clever” part comes in, for the first time. Anyone who’s been a fan of The Seasonal Home for a while is probably familiar with the 2-tiered table that is usually in the foyer. Knowing that a puppy (or child) could easily AND quickly clear off a shelf of easy-to-reach decorations, my idea was to temporarily shuffle some of my accent tables to new locations (in the home) for the season. Check out how nicely a cabinet from the kitchen also fits under the mirror in the foyer!
THE LIVING ROOM
The Living Room is where the first tree went in The Seasonal Home. I knew any tree I displayed would need to be elevated (out-of-the-way) to keep our little pup safe, so the unique & inexpensive idea I came up with is a Drum Stand tree base! The total cost to make this was around $20 and here’s the DIY instructions:
CLICK on photo to better view the instruction details
I chose a color theme of black & gold along with frosty and musical (under the stars) accents. If you look closely (at the tree below), you’ll see that I recycled the black branches from Halloween 2012, adding them into the tree for texture. I also reused 2 silver drums from Christmas 2010 by cutting & adding a length of the black & gold reindeer gift wrap (used on the drum tree stand) and gold cord (to hide the gift wrap edge) so they coordinate, when added to the tree.
It’s so hard to find large, quality glass ornaments in black! Check out Seasons on the Web link (right hand column of this blog) to check out their huge ornament inventory!
And here’s the rest of the room!
HELPFUL HINT: boxes, gift wrapped in coordinating paper & ribbon make an inexpensive room accent for the holidays!
THE FAMILY ROOM
In the Family Room, I couldn’t place too many decorations or snow on The Seasonal Home hearth because of our new pup and her thieving ways. And because she thinks she can carry away just about ANYTHING in her tiny mouth, I had to be sure I used something too large for her to consider… these lighted, faux gifts appear to be just perfect… so far! (lol)
And here’s the rest of the Family Room
I’m starting to notice a “puppy” theme in this room (LOL)
And I simply can’t let a Christmas go by without highlighting a series of my ornaments, like these (Hallmark Windows Series) that feature children peeking into shop windows at Christmas time. A cabinet or sideboard (with shelves) is the perfect place to display a collection. HELPFUL HINT: If you also have a collection of ornaments, consider trying something new by displaying them together (for maximum impact) instead of spreading them around the tree… it’s incredibly fun!
Here’s some close-ups so you can see how much fun adding small details (like snow & trees) can create!
THE KITCHEN
Another Christmas tree to be elevated! And, of course, it should also make sense with the theme I chose – Snowmen and Holiday Sweets to create the Frosty Sweet Shop!
I was inspired by a $500 Cupcake (themed) tree stand I saw at my holiday wholesaler. Although it was beautiful, the cost to make mine was only $10.
Here’s the directions:
Once you place the Cupcake liner around your basket, it’s time to add frosting. Lightly spray-paint polyester fiber fill (comes in a plastic bag at craft & discount box stores) and shape like frosting dripping over the edge of the Cupcake liner. I used a light pink color of spray paint. Finally, add small (matte or glitter-finish) ornaments to the fiber fill to create a look of candy sprinkles on the frosting. I found a pick of several glittered ornaments at Target for only $2.00 and because each one was already on a piece of wire, it was easy to slip them into the fiber fill batting, individually.
And here’s the finished look –
The rest of the room –
HELPFUL HINT: Large foam snowflakes (Dollar Tree) make great winter-theme placemats!
HELPFUL HINT: the 6″ plastic snowflakes I found at the Dollar Tree this year fit perfectly into the chandelier to create instant ice-bling!
Light and motion collectible house by Department 56
KIRKLAND’S has wonderful holiday art… this one lights up!
HELPFUL HINT: Use holiday cards to help you decorate inexpensively! I used 3 inside the openings of this photo display & coordinated a little scene below them.
You’ll find even more details and decorations in this year’s HOLIDAY TOUR on YouTube… here’s the link:
When I find a nice product at a great price, I like to share…
Summer is the longest season of all and it’s the time when I take a break from seasonal decorating. During these 4 months, I display simple, happy, cozy and/or functional things on my mantels and save up my creativity for the holidays ahead.
For several months, I’ve been considering an art purchase as something simple to hang above my family room fireplace mantel. Specifically, I’ve been eying a print at Pier 1, titled “Happy Tree” because it is the perfect complement to my area rug. This print already had a budget-friendly price, but once I noticed it on sale, I was off to Pier 1 immediately! I love it when they have a sale because I love their merchandise. As a matter of fact, it’s a good thing that I don’t work there because I would never take my paycheck home ;-).Their “Happy Tree” print measures 24″ x 24″ and is available in 4 different background colors, so you could also choose 3 or all to display together, vertically or horizontally. The original price was $29.99 and now, it’s only $19.99. To compare – on-line, the cost to purchase a BLANK 24″ x 24″ canvas ranges from $33 – $39, so this is a great deal if you like the print and the price works with your budget. Another thing I liked about this print – if some of the colors (on the tree branches) don’t work perfectly for you, but the background color does, simply grab some acrylic paint, a brush and change them (LOL)! Here’s how it looks in my family room ….
June is still the most popular month for weddings, so I thought now would be a good time to share this idea, as inspiration for anyone with a super-tight wedding budget.
A friend of mine was making plans to renew her wedding vows. She envisioned the ceremony taking place, under the vine-covered arbor, in the back yard of another friend and asked for my help dressing it up.
She was definitely on a tight budget (ahhhh… I love a challenge!), so we assessed what each of us already had to use and what else might be needed to turn the arbor into a sanctuary for their ceremony. One friend had a white, paper aisle runner (from her own wedding), a pedestal table (to hold the ceremony items), and I had a few white paper bells. Also, I went by a warehouse store (COSTCO) to purchase one of their fabulous 50-yard rolls of wired ribbon and we were set!
I cut the aisle runner to hang one-half on the front & the other half on the back (of the arbor). Next, I made several bows for accenting the white paper runner and paper bells and Viola’! A backyard ceremony site was set. Simple and beautiful!
I used the leftover scraps of ribbon to create rose petals, placed them in the skirt of a piece of statuary (I found in the yard) and then moved it near the walkway/aisle – instant flower girl! 😉
Sometimes, I wish more couples would consider holding their weddings at home. There’s no pressure, no rules… just love and togetherness. Oh, and the final total to ready the arbor (for the wedding ceremony) was merely the price of the ribbon $8! I think the next photo demonstrates the grace that was bestowed on my friend and her hubby that day. Congrats to them both for a long, wonderful marriage together, with wishes for many more years of wedded bliss!
Enjoy the creativity!
Eileen
Welcome to… the ART of decorating around the JOY of celebrating!™
Also… I’d love to hear from you!
Feel free to email me with any question, comment, suggestion you may have or with your request to have one of your ideas spotlighted - info@creativefamilytraditions.com
If you show off our creativity, please let them know you found it @ www.TheSeasonalHome.com -
so they can visit us to enjoy even MORE of our creativity! :-)
Click here to watch my FREE VIDEOS and enjoy some musical, holiday spirit:


s")


