Time to decorate the fireplace for Valentine’s Day!
It can look so much nicer to hang something large and Valentine themed over (and under) a mantel full of decorations because it enlarges the look of your festive display. But, one problem is that Valentine themed art is very hard to find and can be expensive so why not create your own?
Step 1 – search your local thrift store for a wooden frame.
A wooden frame can be any color because it’s easy to paint. I found this one last year (it was a dirty, dusty brown color) and painted it white to create a shabby chic look to use in some Spring themed decor.
For Valentine’s Day, I added a red, beaded garland (using spots of hot glue, here & there to secure it) to the frame temporarily and displayed a lightweight wreath of roses from a bow and ribbon in the center of the open frame. Viola!
HELPFUL HINT:I hung the frame on an existing nail, but you could also attach the bow to the top of the frame and lean it against the wall.
Step 2 – “new-purpose” old decorations!
A common thread you will notice in my style of decorating is that I re-use (or “new-purpose”) decorations I already own and many times, for a different holiday! Do you remember the faux fern I used to border the snow under my Fairy themed Christmas tree a couple of years ago? Check out how nice it looks along the back of the mantel with last year’s Dollar Store roses and a $1.00/pkg. of pink, glittered hearts (Dollar Tree) tucked in. It serves as a beautiful backdrop to my sweet Cupid, 2 heart-shaped topiaries and faux rose petals on the mantel.
And just in case you were wondering how roses might look on a tree, for Christmas, check out the rose-themed tree I designed for a client.
Also, if you have a large Valentine sign (like this “BE MINE” from Home Goods), you can use it to decorate the front of a mantel, by removing the hanger and using “Tack-it” (temporary gummy adhesive) to secure it in place for the holiday. I just love how these 2 additions simply & inexpensively enlarged my Valentine’s Day mantel design.
Step 3 – Don’t forget the details! I’ve had my sweet, little Angel for a long time, but this year (for the first time) I happened to notice that she had a tiny bird on her shoulder. Keeping in mind that LOVE comes in all shapes & sizes, I used my hot glue gun to add a small heart to his beak because… of course, he would bring her a little Valentine’s Day greeting!
And if you like the little glass votive candle holder I placed in front of my Cherub, it was super easy to create! The glass votive is a plain one I purchased at the dollar store and added the word “LOVE” to, using my favorite self-adhesive vinyl letters (see office supply stores for these, in all fonts & sizes). You could also use a stencil and paint or etching cream to add a heartfelt sentiment. The candle was even a bargain because I purchased it after Christmas for pennies!
Valentine’s Day is coming soon and (I’ll bet you would have never guessed this, but…) I love to decorate my home for this holiday of hearts. 😉
This year, I decided to spread the message of “LOVE” a little further, by adding a few hearts to my car. People add wreaths, ribbons & lights to their cars at Christmas time, so why not express a little JOY for Valentine’s Day too?
It was easy & inexpensive to do. I found a glittery, weatherproof Valentine heart at Michael’s Crafts and added self-adhesive, felt pads to the back (to protect my car) and finally, zip-tied it to the front grill.
Next, I found some fun, inexpensive Valentine magnet sets. They’re marketed for display on a refrigerator or dishwasher, but I added a few to the back of my car. There are so many in the package, that I can share with neighbors, family & friends!
(If you are unable to find the magnet sets, I have a limited supply in my SHOP)
So, if you decide to spread a little “LOVE” around your own town, it won’t matter if the other drivers are in front of or behind you because, either way, they’ll enjoy your subtle message of “LOVE”… and I’ll bet it brightens their day too!!
Lately, I’ve received a lot of questions from readers about how I store all of my holiday decor. Although I probably have more than most (due to my profession as a holiday designer), I’m going to share some of my storage tricks with you and provide you with some ways to modify it to a more modest collection.
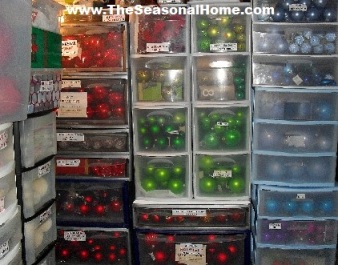
My holiday decor is kept in an on-site storage area that’s only 120 square feet. I can work easily in such a small area because everything is organized by color, holiday theme or “type” of decoration and kept in drawer units, a few tubs or plastic-wrapped to take advantage of vertical storage space.
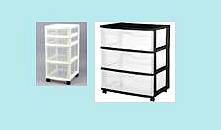
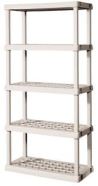
My favorite storage tools are: storage carts, plastic shelving and plastic wrap.
Multi-drawer Storage Carts come in all heights, widths, depths and some even have varied drawer sizes. The varied drawer sizes are useful because you can place small things in the narrow drawers (like icicles, snowflakes, ribbon, ornament hooks, etc.) and larger things in the wider/deeper drawers (like ornaments, tree skirts, tree toppers, etc.) Typically, these drawer units come with 4 caster wheels, which makes them easy to roll into the house and around the room you’re decorating. When you remove the wheels, they are easy to stack to create more vertical storage, which is how I use them to separate my ornaments by color and my decorations by theme. I also LOVE the fact that I can easily grab a single drawer of what I want rather than waste time and energy digging through a container full of everything.
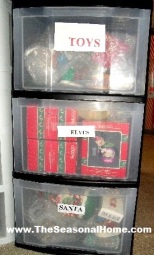
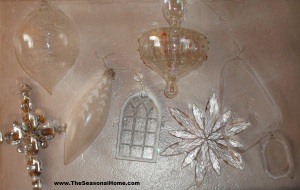
If I happen to have a lot of “different” decorations in a drawer together (because they are the same color), I take a photo featuring 1 of each decoration and tape that to the outside, for a quick visual reference when I’m designing.
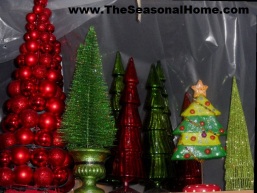
I even use the space on top of my stacked drawer units for storing larger items as well as my collection of tabletop trees, keeping them dust-free by loosely placing dry cleaner bags over them:
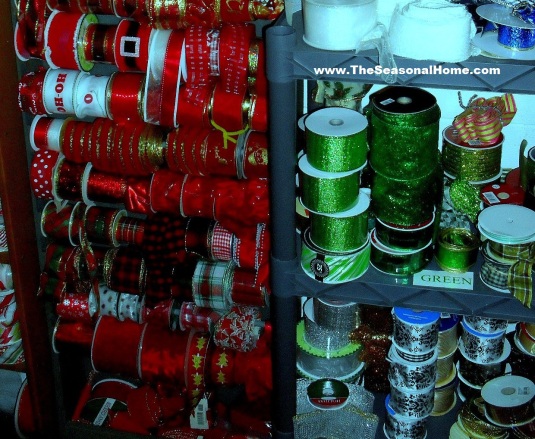
My ribbon collection is quite voluminous because I purchase it on clearance whenever I find a good deal. I purchase several rolls (at least 30 yards) so I can decorate mine or a client’s tree, wreath and garland (minimum) to coordinate. Many people keep larger ribbon collections in plastic tubs or bags, but that can become a quick mess if you don’t secure the end of an open roll of ribbon. I keep my rolls of ribbon on wooden dowels or on an inexpensive plastic shelving unit, by color:
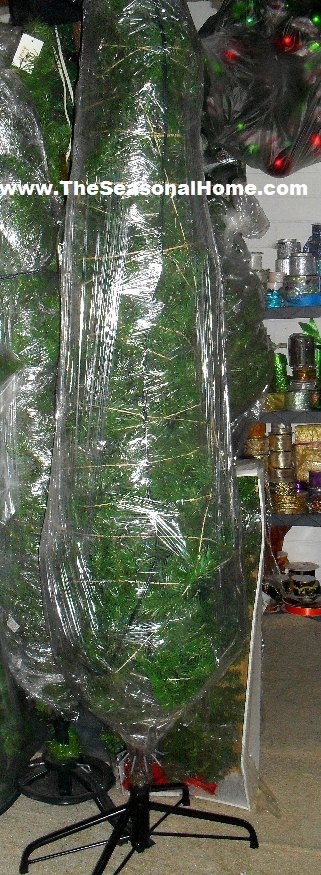
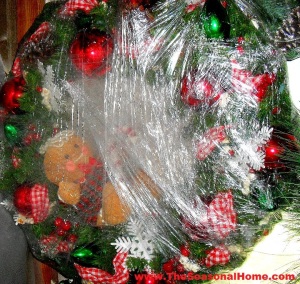
Artificial trees and wreaths can sometimes take up a ton of horizontal space, especially if you try to stuff them back into the boxes they came in. So, I wrap them both in plastic wrap to store them vertically and keep them dust-free. Also, by the time I’m ready to wrap things up for storage, those cinnamon-scented pine cones are on clearance at the craft and mart stores, so I purchase a bag and tuck a few in between the greenery for a wonderful, scented surprise the next time I unwrap my holiday greenery.
To wrap an artificial tree, I gather my scented pine cones, a roll of inexpensive twine, a small roll of packing tape and I remove the roll of plastic wrap from it’s box/container. If your tree is not hinged, however, this method will not work. But if it is… begin by flattening each row of branches. Knot one end of your roll of twine onto a piece of greenery, near the top of the tree. Then, starting at the top, lift up an entire row of the flattened branches and secure it in place vertically by wrapping the twine around it, pulling it tight. While holding the twine tightly, lift up the next row of flattened branches and wrap the twine around that row, pulling it tight. Repeat this process down the entire tree and I have to admit that it’s easier if you have a helper. 😉 Once all of the branches are vertical and wrapped tightly in twine, tuck in a few scented pine cones and wrap the tree in plastic wrap… horizontally and vertically. HINT: I push a piece of greenery (at either end of the tree) through a hole I create in one end of the plastic wrap before I begin wrapping, to hold it in place. When the tree is wrapped entirely in plastic wrap, secure the remaining loose end with a piece of packing tape. Below is how it will look when you’re done and as you can see, using this method keeps their footprint small and makes it easy to nestle several trees very close together:
If you want to wrap up your wreath (keeping it decorated) lightly push the outside wreath branches upward, tuck in your scented pine cones, attach one end of the plastic wrap to one branch and begin wrapping around the entire circumference (under and over) until its completely encased in plastic wrap. I hang my wreaths (decorated or not) on a nail in the wall above my storage drawer units, but if you have a free space on the back of a garage door, use a wreath hanger to store it there. Also, you can use additional wreath hangers (attached to the bottom of the top wreath) to hang a 2nd or 3rd wreath below the first one.
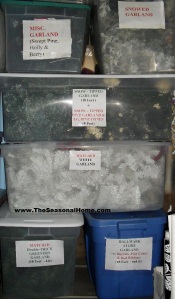
Wrapping garland is a little hard, so that’s one of my holiday items I place in large containers and add scented pine cones to. As you can see, I also note important details and tape those notes to the outside of the container:
I hope sharing these tricks helps you with your holiday decor storage issues. If you have any questions or need suggestions, please feel free to contact me! 🙂
Our 2012 Holiday Home Musical Video is ready to provide you with some inspirational holiday spirit!
Click below, to view:
If you’d like to watch it in HIGH DEFINITION QUALITY, click on the “GEAR” icon (this will appear in the black bar once you hit the PLAY button) and then, click on 720p.
Don’t forget to turn up your speakers, fix a cup of cocoa, put your feet up to…
Enjoy the Creativity!
MERRY CHRISTMAS
Eileen
♥ My sincerest thanks to the talented Production Staff at THEM FEELINGS MULTIMEDIA for creating our video each & every year, simply to support a small business! ♥
[As always, click on any photo to enjoy a larger view]
Christmas decorating at The Seasonal Home had to go in a slightly different direction for 2012, thanks to the addition of a new family member. Meet Miss Lilly Grace, who sometimes looks more like a Teddy Bear…
She’s a very sweet girl who didn’t mind posing for her holiday photo…
And just this week, those cute little puppy ears turned upward (to help her listen for Santa!) and I think she looks more like a fox…
Whatever our little girl turns out to be, because she can get into things (as most puppies do), I had to out-fox her by creating some clever holiday decor. So, if you have a new, young one around this Christmas, whether on 2 or 4 legs, I hope my ideas help you out too! Also in this blog post, you’ll find unique & budget-friendly decorating ideas as well as DIY tutorials, so make yourself a cup of cocoa and enjoy the creativity!
THE FRONT PORCH
Because I created such a large display last year (click HERE to review), I chose to keep things simple outside, utilizing my trusty footed urns (you’ve seen these before! lol) again to hold natural, preserved wreaths, with a large red ornament in the middle of each. The berry garland is actually 3 separate (4-foot) pieces. HELPFUL HINT:attaching several smaller (less expensive) lengths together is easier than trying to find one, (expensive) long berry garland:
I found myself in a “Holly and Berries” mood, this year and it began with my outdoor bench. HELPFUL HINTS: Don’t hesitate to decorate outdoor furniture with garland (adding lights too!) because it welcomes your guests with the “unexpected”. And the mossy gift (on the bench seat) is simply a white box that I covered in moss, using glue… easy!
I love my Goat Cart! And it turned out to be a great investment because it holds larger decorations, for every season! Also, I’ve used it in my garden, yard and now, on my front porch. How versatile is that?!! 🙂
The final front porch touch is an old sled I display every year (found years ago, at a local yard sale… in FLORIDA, no less! lol). I usually add a “PLEASE SNOW” sign to it, but I think I’ve finally given up on that dream and added holly, berries and a skate to it instead. In Florida, we CAN do ice! 😉
THE FOYER
The Holly and Berries snuck right in the front door and laid out beautifully in the Foyer also…. welcoming Christmas, with a little help from Santa, of course!
And here’s where the “clever” part comes in, for the first time. Anyone who’s been a fan of The Seasonal Home for a while is probably familiar with the 2-tiered table that is usually in the foyer. Knowing that a puppy (or child) could easily AND quickly clear off a shelf of easy-to-reach decorations, my idea was to temporarily shuffle some of my accent tables to new locations (in the home) for the season. Check out how nicely a cabinet from the kitchen also fits under the mirror in the foyer!
THE LIVING ROOM
The Living Room is where the first tree went in The Seasonal Home. I knew any tree I displayed would need to be elevated (out-of-the-way) to keep our little pup safe, so the unique & inexpensive idea I came up with is a Drum Stand tree base! The total cost to make this was around $20 and here’s the DIY instructions:
CLICK on photo to better view the instruction details
I chose a color theme of black & gold along with frosty and musical (under the stars) accents. If you look closely (at the tree below), you’ll see that I recycled the black branches from Halloween 2012, adding them into the tree for texture. I also reused 2 silver drums from Christmas 2010 by cutting & adding a length of the black & gold reindeer gift wrap (used on the drum tree stand) and gold cord (to hide the gift wrap edge) so they coordinate, when added to the tree.
It’s so hard to find large, quality glass ornaments in black! Check out Seasons on the Web link (right hand column of this blog) to check out their huge ornament inventory!
And here’s the rest of the room!
HELPFUL HINT: boxes, gift wrapped in coordinating paper & ribbon make an inexpensive room accent for the holidays!
THE FAMILY ROOM
In the Family Room, I couldn’t place too many decorations or snow on The Seasonal Home hearth because of our new pup and her thieving ways. And because she thinks she can carry away just about ANYTHING in her tiny mouth, I had to be sure I used something too large for her to consider… these lighted, faux gifts appear to be just perfect… so far! (lol)
And here’s the rest of the Family Room
I’m starting to notice a “puppy” theme in this room (LOL)
And I simply can’t let a Christmas go by without highlighting a series of my ornaments, like these (Hallmark Windows Series) that feature children peeking into shop windows at Christmas time. A cabinet or sideboard (with shelves) is the perfect place to display a collection. HELPFUL HINT: If you also have a collection of ornaments, consider trying something new by displaying them together (for maximum impact) instead of spreading them around the tree… it’s incredibly fun!
Here’s some close-ups so you can see how much fun adding small details (like snow & trees) can create!
THE KITCHEN
Another Christmas tree to be elevated! And, of course, it should also make sense with the theme I chose – Snowmen and Holiday Sweets to create the Frosty Sweet Shop!
I was inspired by a $500 Cupcake (themed) tree stand I saw at my holiday wholesaler. Although it was beautiful, the cost to make mine was only $10.
Here’s the directions:
Once you place the Cupcake liner around your basket, it’s time to add frosting. Lightly spray-paint polyester fiber fill (comes in a plastic bag at craft & discount box stores) and shape like frosting dripping over the edge of the Cupcake liner. I used a light pink color of spray paint. Finally, add small (matte or glitter-finish) ornaments to the fiber fill to create a look of candy sprinkles on the frosting. I found a pick of several glittered ornaments at Target for only $2.00 and because each one was already on a piece of wire, it was easy to slip them into the fiber fill batting, individually.
And here’s the finished look –
The rest of the room –
HELPFUL HINT: Large foam snowflakes (Dollar Tree) make great winter-theme placemats!
HELPFUL HINT: the 6″ plastic snowflakes I found at the Dollar Tree this year fit perfectly into the chandelier to create instant ice-bling!
Light and motion collectible house by Department 56
KIRKLAND’S has wonderful holiday art… this one lights up!
HELPFUL HINT: Use holiday cards to help you decorate inexpensively! I used 3 inside the openings of this photo display & coordinated a little scene below them.
You’ll find even more details and decorations in this year’s HOLIDAY TOUR on YouTube… here’s the link:
Here’s an idea for creating a spooky Halloween fireplace. And while showing you “how” I created it, I’m also going to cover a few of the “steps” behind my design style.
In Spring 2011, I used a green bird cage as the focal point of a bird-themed design. [By the way, the bird cage was a collectibles display that a Hallmark store was done using and decided to sell, so I picked it up for only a few dollars. This happens often in gift shops, so you should always express your interest and leave your name & number with the manager if a unique display catches your eye.]When I’m decorating, my first step is to find inspiration and this bird cage provided my first bit of inspiration for this spooky Halloween fireplace design.
My second step is to look for things to re-purpose, to save money. I knew the bird cage would look very different if I simply painted it, so I covered the mirror on the back wall (to protect it) and used a can of black spray paint to give it more of a Halloween look and viola’… a bat cage was born!
Look for decorations that provide big bang for your dollar, like this large, removable “Flying Bats” window cling.
Re-purpose, before you purchase! I wanted to place the window cling on a mirror above my fireplace, but there was one problem – I had no mirror above my fireplace! LOL So, I looked around and moved a mirror from another wall (this one was over a chest in my living room), leaning it up against the wall, above the fireplace. This not only solved the problem, but once again, without spending any money. By the way, this would also be a look you could easily create over a tabletop, in a foyer, etc.
Create stories and add “action” to make decorations more interesting. This draws in visitors who see your seasonal decor and adds whimsy too – who doesn’t love whimsy, especially during the holidays? ;-). Positioning the (newly painted) bird cage next to the mirror and adding a few of the window cling bats (to the mirror INside the cage) makes it look as though the bats have escaped through the open door of the bat cage. Adding a small skeleton (inside the cage) created a little whimsy because you find yourself wondering if he was somehow helpful in unlocking the cage door, so the bats could fly free.
Include lighting (lamps, candles, etc.) in your decorations. I absolutely LOOOOOVE these new Spider candles, so I chose them to add that eerie glow to my mantel scene. These are some of the best battery-operated candles because they’re lightweight plastic, won’t melt, and not only does the faux wick light up, but also the silver, glittery spider on the front (creating some BONUS lighting).
Combine similar things to add layers to your look. I got lucky and found this large, gorgeous, silver, glittered crow at a warehouse sale, for only $3.00, and couldn’t resist perching him on top of the bat cage to create even more action.
Accessorize to fill up empty spots! I added a few small pumpkins, black twig garland (Michael’s Crafts), preserved moss and a length of wide ribbon to fill in the empty spots.
Carry the look all the way to the floor. I placed larger pumpkins, branches (I gathered outside, spray painted black & added a couple of orange spiders to) and 3 lanterns in the fireplace opening & around the hearth.
Again, add lighting! To create a lit look (inside the lanterns), I took one strand of orange lights and fed a few of the lights inside each of the lanterns to give them a warm, autumn glow.
And here’s the complete look… it’s one of my favorites I’ve ever come up with… I hope you like it too!
HAPPY HALLOWEEN… enjoy the creativity!
Eileen
P.S. I have a limited number of a few of the items above in my SHOP, while supplies last.
This Fall, I’m definitely into pumpkins and the warmth of falling leaves and I think the foyer is the perfect place to display a family-representative pumpkin as well as one that says…
“WELCOME HOME”!
And I wish I could shrink myself down to spend time in this sweet Craft Shop and attend the Scarecrow Festival! 😉
House – Scarecrow Harvest Festival by Dept. 56
Placing decorations on top of risers (like candlesticks and cake plates) gives them more prominence and are easier to dust around during the season.
And if you want to display a wreath in the center of a mirror or artwork and cannot hang it from ribbon, try a heavy duty (clear) suction cup!
This is another design that would also look great over a mantel.
This SALE is for the Early Birds among my readers – those of you who have some idea about your holiday themes and want to grab unique decorations to spice things up…. at a great price! For a LIMITED TIME, please enjoy 20% off your ENTIRE ORDER in The Seasonal Home’s Shop!!! Also, included in your order will be a BONUS gift…… AND…… shipping reduces on each additional item you add to your SHOPPING CART. In other words, we combine your shipping rate to save you money!
So, take your Coupon Code with you (SPOOKY) and enjoy browsing the adorable holiday items among the Categories of The Seasonal Home’s store and take advantage of our sale. Don’t wait because many of our items are one-of-a-kind!
I’ll be adding more items as time permits, but there are almost 100, hand-chosen or handmade (by me!) items for you to choose from now and once (some of them) are gone…. they’re gone!
Ahhhhh, summer! Sooner or later, we all end up at the beach. And if you’re the typical beach vacationer, you undoubtedly have picked up a few shells along the way, so here’s a few ideas of things you can do with them –
Apothecary Jar fillers
A conversation table
Gorgeous Summer Wreath
Art!
A simple centerpiece
An accent for a wall or door decoration
Shell candles for your outdoor OR indoor spaces
A seashell bridal bouquet and boutonniere for your upcoming wedding
A summer theme birthday! Photo courtesy of Coastal Living
Jewelry!
A keepsake ornament. Photo courtesy of oneartmama.blogspot.com
While at the beach… don’t forget to create a cool photo for your holiday cards! [photo hint: place your camera close to a small sand snowman to make him appear full-size] Photo courtesy of sandcastlecentral.com
In today’s marketplace, paper comes in so many forms and is a perfect fit for my creative, yet budget-conscious, brain. So, if you’re looking for new ways to transform your fireplace from Winter to Spring (and Easter), read on because I think you’ll like the creative way I found to incorporate 3 different paper products to create 2 new designs.
IDEA #1
For the first fireplace look, SCRAPBOOK PAPER helped me create an “Art Comes Alive” look above The Seasonal Home’s family room mantel.
Tracing around a wood butterfly shape (Hobby Lobby – 50 cents) created the large butterflies and a cookie cutter (I already owned) helped me create the smaller butterflies. Because I have a hard surface surrounding my fireplace, I was able to use dots of hot glue, from a low-melt glue gun, to attach my butterflies to this surface. You could also use “Tack It” (office supply dept.) or COMMAND strips to attach them to more delicate surfaces.
I found the vintage frame at a thrift store ($3), lightly spray painted it white and placed it on the mantel. [NOTE: Typically, these are reasonable if they don’t have artwork in them]. The yellow clay pots are a recycle from a look I created last Easter (https://seasonalhome.wordpress.com/2011/03/07/yellow-at-easter-its-not-just-for-chicks-anymore/ )… so, “zero” dollars. The aqua, polka-dotted bunnies ($3.99 each) and the yellow, polka-dotted candles ($4.99 each) are both from Old Time Pottery. The yellow vine came from a clearance section of one of my favorite local stores ($6.75) as did the aqua birdie ($1.99). I picked up the yellow gingham ribbon (see clay pot trim & mantel inset) at Joann’s, etc. for only $1.75 with a 50% off coupon and the large aqua flower at Hobby Lobby for $1.99. If you’re familiar with my blog, you’ll recognize my white candlesticks, bird nests and eggs because they roam somewhere different, every year, in The Seasonal Home.
For Part #2 of this look, I wanted to transition my fireplace hearth from Winter to Spring. In keeping with my nature look, I thought it would be a great idea to make a cushion, flanked by some green topiaries from around the house, to create a park bench feel and also, add additional seating for my Spring and Easter guests. The aqua gingham fabric, buttons, yellow bias tape & rope insert as well as the 2 bed pillows – $15.00 (Walmart). So, this entire idea cost $47 to create and I love the fresh look!
IDEA #2
For the second look, I used two different paper products – Green, plaid Hallmark gift wrap (love this stuff because the lines on the opposite side make it easy to cut straight! lol) and white poster board (50 cents), both from Walmart ($4). I taped a large piece of gift wrap to the back wall & upper inset of the fireplace and removed the logs/grate, to replace it with Dept. 56 artificial grass ($14), edged out with artificial lettuce leaves, to create a base for my 2 sitting, Mom & baby bunnies and used fuzzy Christmas snowball ornaments for their tails. Finally, I dotted the grass with a few small daisies and also sprinkled them on the mantel and around the large, white bunny cookie jar (sitting inside the cabbage plate) to create continuity.
CLICK on any photo to enlarge
On the mantel, I used items you’ll also recognize from previous posts, including the wreath, which is the yellow & white daisy wreath from the post I shared above. I simply added a few different colored flowers to it. And of course, I simply cannot decorate for ANY holiday without filling up one of my apothecary jars. This time I added a set of glittered Easter Eggs.
On the side table, you’ll recognize another one of my white candlesticks, on top of which I placed a small clay pot of pink daisies. You can place SO many different things on top of candlesticks during different seasons, so I highly recommend investing in a set of these to help with your decorating.
This look would be hard to price out for you because I used many items I already had, but it turned out to be one of my favorite looks because it’s so bright & cheery!
Welcome to… the ART of decorating around the JOY of celebrating!™
Also… I’d love to hear from you!
Feel free to email me with any question, comment, suggestion you may have or with your request to have one of your ideas spotlighted - info@creativefamilytraditions.com
If you show off our creativity, please let them know you found it @ www.TheSeasonalHome.com -
so they can visit us to enjoy even MORE of our creativity! :-)
Click here to watch my FREE VIDEOS and enjoy some musical, holiday spirit:


s")


