I found a great product, just arriving in The Dollar Tree stores, that won’t last! And if you don’t think you need them, you may change your mind when you check out the suggestions I have for their use!
What is it? Large bamboo poles (apx. 5 ft. tall x 1″ – 2″ in diameter). Although they vary slightly, in height & diameter, I found most of them to be fairly large. Typically, bamboo poles cost $5-$7 each in DIY, craft or floral supply stores and make great decorative accents. At this price ($1.00), they are very affordable and will provide inexpensive inspiration for you!
Here’s what they look like (in the store) to make it easier for you to spot them, or when asking your local Dollar Tree staff where to find them. I found them hovering between the (teeny) craft section and toy dept.
Distance photo (for size scale)
By the way, I didn’t see this item on their website, so it is probably an “in-store” item only.
The first (and easiest!) suggestion I have for you is to place a few inside a large planter, vase or pot to use as a trending, contemporary and nearly care-free decoration (just a little dusting once in a while). It would look great inside OR (because they’re weatherproof) outside, as seen in one of the photos below:
Consider a greenery base to avoid dust inside the container
The perfect accent with the current, popular trend of Asian decor
Add lighting (in container) for a super-contemporary look
Because they are weatherproof, they make the perfect outdoor accent
Another great idea is to use them to create your own fencing. There are tons of DIY instructions for many versions of this type of project (on the internet),
from easy to complex!
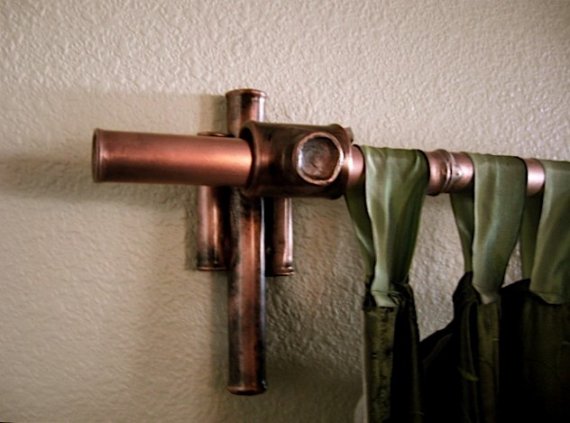
You could also use them as inexpensive curtain rods, “as-is”, spray painted or bundled!
photo courtesy of The Gardener’s Cottage. For a thicker rod, bundle several together & use 2 pre-made finials or unique wine bottle stoppers as finials
photo courtesy of etsy shop “Copper Bamboo”
And if you’re handy enough to hang a couple of rod holders on the wall, you could use them as a shower curtain rod in a tropical-themed bathroom:
Create your own floor lamp! Or cut smaller pieces for a table lamp.
Or how about an accent to a wedding reception centerpiece?
Need something sturdy to help you support your garden greens?
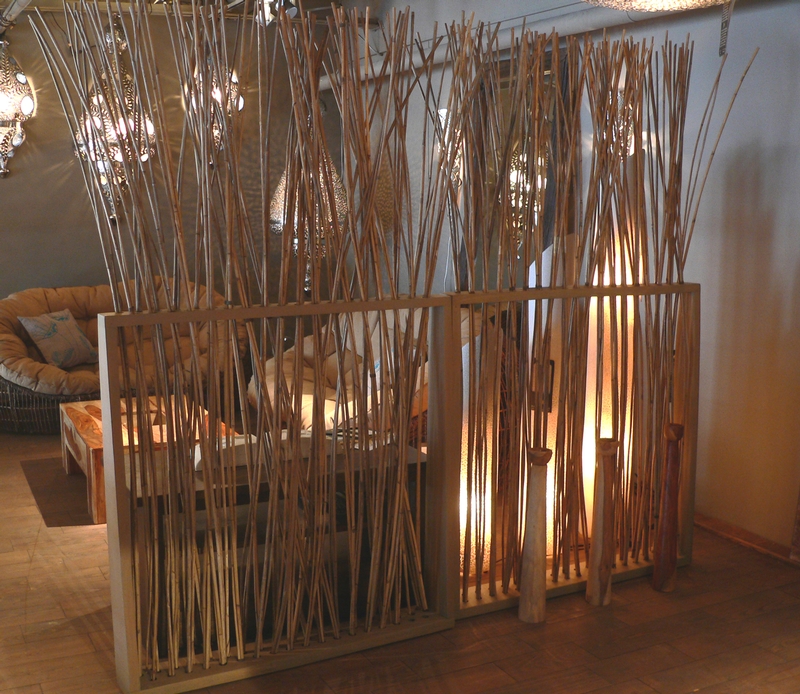
How about making a DIY frame to hold bamboo creating an inexpensive Privacy Screen… inside OR outside your home?
Adding some lighting creates even more ambiance!
OR, do you need a privacy screen from the “Sun”? Then, use them to create a cover for your pergola.
photo courtesy of Beautiful Bamboo Blogspot
Ok, as long as we’re talking back yard, HERE’S a project for ya! Buy a bunch to create your own Tiki Bar. LOL 😉
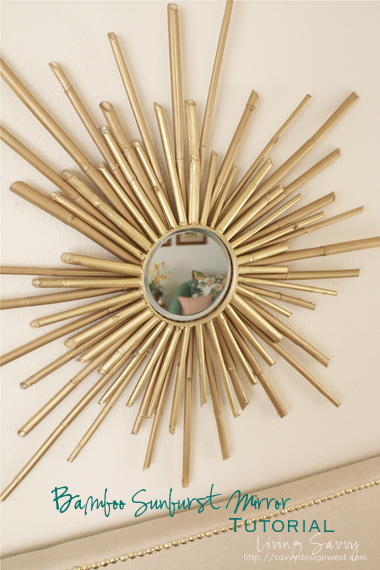
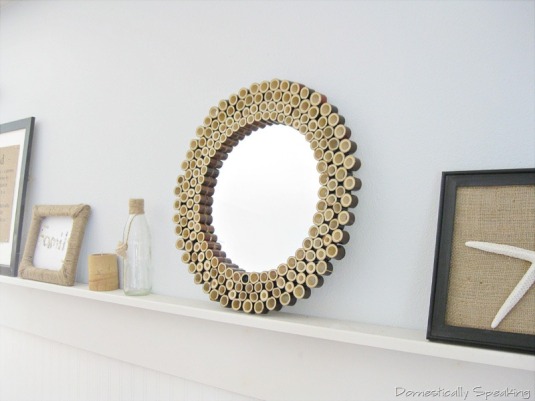
I absolutely LOVE how great they look glued to the back OR front of a mirror to create inexpensive wall art!
[clicking on either of the next 2 photos will open a separate internet window with each of these creative blogger’s free tutorials]
photo courtesy of Savvydesignwest.com
photo courtesy of Domestically Speaking blog
And, of course, my favorite…. as part of a fountain… ahhhh serenity!
Our 2012 Holiday Home Musical Video is ready to provide you with some inspirational holiday spirit!
Click below, to view:
If you’d like to watch it in HIGH DEFINITION QUALITY, click on the “GEAR” icon (this will appear in the black bar once you hit the PLAY button) and then, click on 720p.
Don’t forget to turn up your speakers, fix a cup of cocoa, put your feet up to…
Enjoy the Creativity!
MERRY CHRISTMAS
Eileen
♥ My sincerest thanks to the talented Production Staff at THEM FEELINGS MULTIMEDIA for creating our video each & every year, simply to support a small business! ♥
[As always, click on any photo to enjoy a larger view]
Christmas decorating at The Seasonal Home had to go in a slightly different direction for 2012, thanks to the addition of a new family member. Meet Miss Lilly Grace, who sometimes looks more like a Teddy Bear…
She’s a very sweet girl who didn’t mind posing for her holiday photo…
And just this week, those cute little puppy ears turned upward (to help her listen for Santa!) and I think she looks more like a fox…
Whatever our little girl turns out to be, because she can get into things (as most puppies do), I had to out-fox her by creating some clever holiday decor. So, if you have a new, young one around this Christmas, whether on 2 or 4 legs, I hope my ideas help you out too! Also in this blog post, you’ll find unique & budget-friendly decorating ideas as well as DIY tutorials, so make yourself a cup of cocoa and enjoy the creativity!
THE FRONT PORCH
Because I created such a large display last year (click HERE to review), I chose to keep things simple outside, utilizing my trusty footed urns (you’ve seen these before! lol) again to hold natural, preserved wreaths, with a large red ornament in the middle of each. The berry garland is actually 3 separate (4-foot) pieces. HELPFUL HINT:attaching several smaller (less expensive) lengths together is easier than trying to find one, (expensive) long berry garland:
I found myself in a “Holly and Berries” mood, this year and it began with my outdoor bench. HELPFUL HINTS: Don’t hesitate to decorate outdoor furniture with garland (adding lights too!) because it welcomes your guests with the “unexpected”. And the mossy gift (on the bench seat) is simply a white box that I covered in moss, using glue… easy!
I love my Goat Cart! And it turned out to be a great investment because it holds larger decorations, for every season! Also, I’ve used it in my garden, yard and now, on my front porch. How versatile is that?!! 🙂
The final front porch touch is an old sled I display every year (found years ago, at a local yard sale… in FLORIDA, no less! lol). I usually add a “PLEASE SNOW” sign to it, but I think I’ve finally given up on that dream and added holly, berries and a skate to it instead. In Florida, we CAN do ice! 😉
THE FOYER
The Holly and Berries snuck right in the front door and laid out beautifully in the Foyer also…. welcoming Christmas, with a little help from Santa, of course!
And here’s where the “clever” part comes in, for the first time. Anyone who’s been a fan of The Seasonal Home for a while is probably familiar with the 2-tiered table that is usually in the foyer. Knowing that a puppy (or child) could easily AND quickly clear off a shelf of easy-to-reach decorations, my idea was to temporarily shuffle some of my accent tables to new locations (in the home) for the season. Check out how nicely a cabinet from the kitchen also fits under the mirror in the foyer!
THE LIVING ROOM
The Living Room is where the first tree went in The Seasonal Home. I knew any tree I displayed would need to be elevated (out-of-the-way) to keep our little pup safe, so the unique & inexpensive idea I came up with is a Drum Stand tree base! The total cost to make this was around $20 and here’s the DIY instructions:
CLICK on photo to better view the instruction details
I chose a color theme of black & gold along with frosty and musical (under the stars) accents. If you look closely (at the tree below), you’ll see that I recycled the black branches from Halloween 2012, adding them into the tree for texture. I also reused 2 silver drums from Christmas 2010 by cutting & adding a length of the black & gold reindeer gift wrap (used on the drum tree stand) and gold cord (to hide the gift wrap edge) so they coordinate, when added to the tree.
It’s so hard to find large, quality glass ornaments in black! Check out Seasons on the Web link (right hand column of this blog) to check out their huge ornament inventory!
And here’s the rest of the room!
HELPFUL HINT: boxes, gift wrapped in coordinating paper & ribbon make an inexpensive room accent for the holidays!
THE FAMILY ROOM
In the Family Room, I couldn’t place too many decorations or snow on The Seasonal Home hearth because of our new pup and her thieving ways. And because she thinks she can carry away just about ANYTHING in her tiny mouth, I had to be sure I used something too large for her to consider… these lighted, faux gifts appear to be just perfect… so far! (lol)
And here’s the rest of the Family Room
I’m starting to notice a “puppy” theme in this room (LOL)
And I simply can’t let a Christmas go by without highlighting a series of my ornaments, like these (Hallmark Windows Series) that feature children peeking into shop windows at Christmas time. A cabinet or sideboard (with shelves) is the perfect place to display a collection. HELPFUL HINT: If you also have a collection of ornaments, consider trying something new by displaying them together (for maximum impact) instead of spreading them around the tree… it’s incredibly fun!
Here’s some close-ups so you can see how much fun adding small details (like snow & trees) can create!
THE KITCHEN
Another Christmas tree to be elevated! And, of course, it should also make sense with the theme I chose – Snowmen and Holiday Sweets to create the Frosty Sweet Shop!
I was inspired by a $500 Cupcake (themed) tree stand I saw at my holiday wholesaler. Although it was beautiful, the cost to make mine was only $10.
Here’s the directions:
Once you place the Cupcake liner around your basket, it’s time to add frosting. Lightly spray-paint polyester fiber fill (comes in a plastic bag at craft & discount box stores) and shape like frosting dripping over the edge of the Cupcake liner. I used a light pink color of spray paint. Finally, add small (matte or glitter-finish) ornaments to the fiber fill to create a look of candy sprinkles on the frosting. I found a pick of several glittered ornaments at Target for only $2.00 and because each one was already on a piece of wire, it was easy to slip them into the fiber fill batting, individually.
And here’s the finished look –
The rest of the room –
HELPFUL HINT: Large foam snowflakes (Dollar Tree) make great winter-theme placemats!
HELPFUL HINT: the 6″ plastic snowflakes I found at the Dollar Tree this year fit perfectly into the chandelier to create instant ice-bling!
Light and motion collectible house by Department 56
KIRKLAND’S has wonderful holiday art… this one lights up!
HELPFUL HINT: Use holiday cards to help you decorate inexpensively! I used 3 inside the openings of this photo display & coordinated a little scene below them.
You’ll find even more details and decorations in this year’s HOLIDAY TOUR on YouTube… here’s the link:
[CLICK ON ANY PHOTO,for a more detailed & larger view]
This weekend was our Annual “WELCOME FALL!” Picnic at The Seasonal Home… a celebration that I started, several years ago, with the daughters of one of my best friends (who happens to live next door). The first year, it was simply my way of giving her a little parent-break, but has now become an annual tradition. Once my boys were grown, I really missed the creativity of doing fun things like this so now, I’m creating new memories with my 2 sweet neighbors – Emme and Gretta.
This celebration is our way of welcoming in the Autumnal Equinox (a/k/a Fall) and even though it is usually still hot outside, a good fan and our imaginations help us pretend that it’s breezy & cool. Here’s a peek at some of our fun, in case you want to start this tradition yourself.
We always have our picnic first. This year, we decided to make grilled cheese sandwiches (cut into pumpkins), homemade sweet potato fries (Sandra Lee’s recipe, Food Network), and diced apples over graham cracker crumbs with a drizzle of hot caramel (an idea we thought up ourselves). P.S. If you ever want to see a young child have fun, give them some graham crackers in a plastic bag and show them how to turn them into crumbs, using a wooden rolling pin – hilarious!
For dessert, we made a healthier chocolate muffin from a new mix called “Simple Mornings”. They served as our cupcakes, topped with a little homemade cream cheese frosting (Food Network recipe), sprinkles and a small, candy pumpkin.
We had SO much fun making all the food… together!
Of course, we decorated for our picnic too! I found over-sized, felt, fall leaves (in 3 different colors) at The Dollar Tree and we simply used a piece of fishing line to hang them from the pergola beams.
They looked so pretty (moving), when a breeze finally kicked up! Check it out in this short YouTube video I made:
With the addition of a few scarecrows, pumpkins and fall flowers, we were ready to enjoy our “WELCOME FALL” picnic.
And funny enough, every year, we seem to be visited by a representative of Mother Nature. Last year, it was a caterpillar and this year, we enjoyed the company of a beautiful & HUGE Swallowtail Butterfly, who really liked the flowers in my up-cycled wheelbarrow Fairy Garden.
And he didn’t even seem to mind that I was following him around with my camera.
The girls were really hoping he would land on their fingers.
Once he fluttered off, it was time for lunch!
Uhhh… please ignore the well done sweet potato fries – they were the unfortunate casualty of our hectic kitchen preparation.
Once we saw that a few of our fries were slightly overcooked, the girls tried to make lemonade out of lemons by suggesting that “maybe adding some ketchup will help”…. soooooo sweet!
After we ate, it was time for crafts and games! We usually have an apple bobbing contest, but little Gretta is about to lose a front tooth, so we decided to try some new things this year.
So, first up…. a little painting of face masks.
And ta-dum…. the cute, personalized results. Hey, that looks a awful lot like my hair!!
Next, a competitive game of Halloween B-I-N-G-O. Check out the concentration on their faces (LOL).
And last, but not least…. a game of PIN THE HAT ON THEWITCH.
I’m not sure who was the best spinner or worst pin-er, but when you’re having fun, the results don’t really matter.
First up was Gretta….
Hmmm… close! Then, it was Emme’s turn.
In the end, it really didn’t matter who won because I had gathered a few inexpensive, special treats, as a surprise for both of the girls.
I found a cute $1.00 pumpkin box (Wal mart) to place them all in and added a “Happy 1st Day of Fall” note to each.
Once we headed back inside (we had enjoyed the Florida heat & humidity quite enough, thank you very much!), the girls had fun opening their goodie boxes.
Two of their favorite things were the Spider rings, modeled here by Emme –
and a small bag of the newest M & M flavor “Candy Corn White Chocolate”…. YUM!
In the end, we all agreed we had tons of fun and that cupcakes taste even better in air-conditioned comfort! (LOL)
I hope we inspired you to consider starting your own “Welcome Fall Picnic” tradition. 🙂
I not only love to decorate, but also entertain on a budget. So, I decided to challenge myself to see if I could purchase everything I needed to create a Patriotic Table-scape AND a picnic for 4, including drinks and dessert for…. are you ready… only $25!!!!
Decorations first! I knew if I could find a source for inexpensive table linens, napkins, plates, cups, plastic silverware and decorations, this “dinner impossible” mission would be half-way there. No problem – I purchased 98% of the items, that make up this table-scape, at the Dollar Tree, for a total cost of only $10.00!!
All I had to add in was a cake plate, 2 candle sconces (to use in between) and a plain, white plate to create the centerpiece tower
and bring out my apothecary beverage dispenser (filled with fresh strawberries, water & ice).
Here’s what I purchased:
1 White tablecloth (3/4th used for picnic table; 1/4th used for drink table)
1 Pkg. Red plastic Plates
1 Pkg. White Plastic Silverware
1 Pkg. Red Plastic Cups
2 Pkgs. coordinated napkins
1 Patriotic Bunting Banner (cut apart & split between both tables edges & surfaces)
1 Pkg. American Mini Flags
1 pkg Pipe Cleaners
1 Blue metallic mylar weight with star sprays
To create the centerpiece details, cut a 3″ star out of cardboard, coat in Elmer’s glue and red glitter and place it on a wooden (kabob) skewer. To create the shooting sparkler look with the pipe cleaners, simply wind each one (individually) around a 1/2″ pen or marker & slide off. Use hot glue to attach the end of these and the flags into the Blue Mylar weight.
NEXT, The Food! I knew that keeping the menu simple, but traditional, would help with my limited budget. But, I also wanted to be just as creative with the food as I was with the decorations. Starting with the burgers, I found these very cool disposable, aluminum, star-shaped, baking trays – As you can see, their intended use is to bake star-shaped cupcakes, but I knew they would also work to make small, star-shaped burgers. Because the burgers would be baking in their own juices, I purchased a very lean ground beef and added 1/4 of a yellow onion, and a small amount of Montreal Steak Seasoning and Italian Dressing Mix.
For each star burger, I used 2 aluminum trays and coated them with an Olive Oil spray before adding an apx. 2″ ball of the beef mixture, which I spread into the star container, from the center out. Next, I placed them on a cookie sheet (with sides), to which I added a little water and baked them in a 350-degree oven for apx. 15-20 minutes.
Mixing 2 different beans, crispy bacon, BBQ sauce and brown sugar made for a yummy baked bean recipe.
A healthy salad rounded out my main menu.
For the beverage, I added a small container of strawberries to icy water… simple, refreshing and low cal! Finally, I used my smallest star cookie cutter to cut star shapes from 1/2″ slices of watermelon, used a plastic star frosting tip (inserted into a cut corner of a plastic baggy) to add lite cool whip and then topped it off with a single blueberry. [HINT: place watermelon stars on a paper towel, after cutting, to absorb excess water until ready to serve] Last, but not least, I coated strawberries with a small amount of white chocolate and rolled them in blue and red Pop Rocks (candy). If you’ve never eaten Pop Rocks, they snap, crackle & pop (just like fireworks!) in your mouth, so I thought they would be a fun surprise for my guests and fit my patriotic theme perfectly! As you can see, my multi-level centerpiece was the perfect serving tray for both of my fruity, patriotic desserts! I made that by combining a single cake plate with another square, white plate and I used 2 candle holders I had in between to create a multi-level serving dish. (HINT: use a low melt hot glue gun to securely attach the risers, cake plate & square plate to each other and thereby, avoid any tipping mishaps).
So, I did it! I stayed within my $25 budget for a Patriotic Picnic. I’m sure you can do the same. Enjoy your celebration!!!!
Enjoy the Creativity!
Eileen
Welcome to… the ART of decorating around the JOY of celebrating!™
Also… I’d love to hear from you!
Feel free to email me with any question, comment, suggestion you may have or with your request to have one of your ideas spotlighted - info@creativefamilytraditions.com
If you show off our creativity, please let them know you found it @ www.TheSeasonalHome.com -
so they can visit us to enjoy even MORE of our creativity! :-)
Click here to watch my FREE VIDEOS and enjoy some musical, holiday spirit:


s")


