Once I removed the ribbon, “Merry Christmas” sign and the tabletop decorations, I noticed how beautiful and wintry the greenery looked, so I just added some glittered red hearts (wall hangings cut-apart from the dollar section of Target), red velvet heart picks from The Dollar Store and my “smooch” stickers (purchased a few years ago).
Total cost to take it from Christmas to Valentine’s Day: $3.00
I replaced the hanging ornaments (on the curtain rod) with a simple valance I sewed, using $3.00 worth of fabric from Wal-mart and added a $3.00 felt heart garland from Target to trim it out.
The tree ornaments are 3-piece, glittered Valentine wall hangings (from the dollar section of Target) that I cut apart and used alongside cardboard hearts (removed from a $4.00 Walgreen’s wreath). I added one new thing that softened the look of the white tree and made a wonderful garland – inexpensive light pink feather boas! For the base, I made a pink cupcake liner (from poster board) to replace the blue (Christmas) one and exchanged the glittered ornaments, tucked in the pink frosting (spray painted polyester batting) with sprinkles, which I made from leftover poster board and paper. The Christmas tree was bright and happy, whereas the Valentine’s Day tree is soft and sweet!
I’ll be hosting a Valentine themed meeting next month, so I test-drove the table cover, dishes and chair decorations to see how they’ll look too. I’m loving this lush, pink color! And by the way, the chair decorations are nothing more than another glittered “Conversation Heart” wall hanging I also found in the dollar section at Target and tied on the back of the chair with an inexpensive piece of ribbon.
It was fun to fill my cabinets with Valentine goodies too and I re-purposed some Christmas decorations there… can you spot them?
I covered the star (on the top) with a couple of the cardboard hearts and of course, placing it next to a couple of Valentine cupcakes creates an instant Valentine’s Day treat!
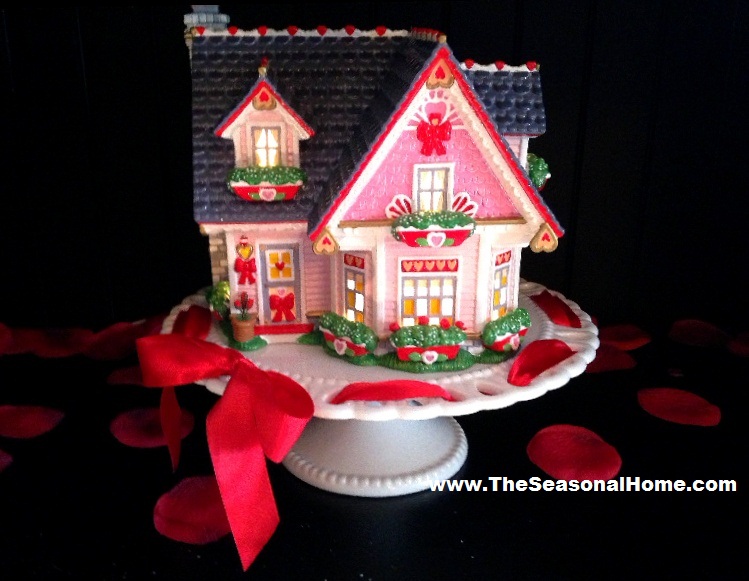
Remember this cake plate with a red bow, from Christmas?
It’s just as cute under a Department 56 Valentine house!
I use my apothecary jars year round, including Christmas. I changed the candy, in several of them to Conversation Hearts (for Valentine’s Day) but kept the pastel jelly beans in one because the colors were perfect!
Here’s an idea you might want to try – use apothecary jars as frames by adding a few Conversation Hearts and tucking your photos or vintage Valentine Cards inside. You could display photos of you and your sweetie or your kids/grandkids. It’s just a different way to display photos or other keepsakes without purchasing a separate & costly Valentine’s Day frame. And hey… it makes a real conversation piece too!
Stay tuned for a Shabby Chic idea for Valentine’s Day (blog post) next, coming up in a couple of days!
Our 2012 Holiday Home Musical Video is ready to provide you with some inspirational holiday spirit!
Click below, to view:
If you’d like to watch it in HIGH DEFINITION QUALITY, click on the “GEAR” icon (this will appear in the black bar once you hit the PLAY button) and then, click on 720p.
Don’t forget to turn up your speakers, fix a cup of cocoa, put your feet up to…
Enjoy the Creativity!
MERRY CHRISTMAS
Eileen
♥ My sincerest thanks to the talented Production Staff at THEM FEELINGS MULTIMEDIA for creating our video each & every year, simply to support a small business! ♥
[As always, click on any photo to enjoy a larger view]
Christmas decorating at The Seasonal Home had to go in a slightly different direction for 2012, thanks to the addition of a new family member. Meet Miss Lilly Grace, who sometimes looks more like a Teddy Bear…
She’s a very sweet girl who didn’t mind posing for her holiday photo…
And just this week, those cute little puppy ears turned upward (to help her listen for Santa!) and I think she looks more like a fox…
Whatever our little girl turns out to be, because she can get into things (as most puppies do), I had to out-fox her by creating some clever holiday decor. So, if you have a new, young one around this Christmas, whether on 2 or 4 legs, I hope my ideas help you out too! Also in this blog post, you’ll find unique & budget-friendly decorating ideas as well as DIY tutorials, so make yourself a cup of cocoa and enjoy the creativity!
THE FRONT PORCH
Because I created such a large display last year (click HERE to review), I chose to keep things simple outside, utilizing my trusty footed urns (you’ve seen these before! lol) again to hold natural, preserved wreaths, with a large red ornament in the middle of each. The berry garland is actually 3 separate (4-foot) pieces. HELPFUL HINT:attaching several smaller (less expensive) lengths together is easier than trying to find one, (expensive) long berry garland:
I found myself in a “Holly and Berries” mood, this year and it began with my outdoor bench. HELPFUL HINTS: Don’t hesitate to decorate outdoor furniture with garland (adding lights too!) because it welcomes your guests with the “unexpected”. And the mossy gift (on the bench seat) is simply a white box that I covered in moss, using glue… easy!
I love my Goat Cart! And it turned out to be a great investment because it holds larger decorations, for every season! Also, I’ve used it in my garden, yard and now, on my front porch. How versatile is that?!! 🙂
The final front porch touch is an old sled I display every year (found years ago, at a local yard sale… in FLORIDA, no less! lol). I usually add a “PLEASE SNOW” sign to it, but I think I’ve finally given up on that dream and added holly, berries and a skate to it instead. In Florida, we CAN do ice! 😉
THE FOYER
The Holly and Berries snuck right in the front door and laid out beautifully in the Foyer also…. welcoming Christmas, with a little help from Santa, of course!
And here’s where the “clever” part comes in, for the first time. Anyone who’s been a fan of The Seasonal Home for a while is probably familiar with the 2-tiered table that is usually in the foyer. Knowing that a puppy (or child) could easily AND quickly clear off a shelf of easy-to-reach decorations, my idea was to temporarily shuffle some of my accent tables to new locations (in the home) for the season. Check out how nicely a cabinet from the kitchen also fits under the mirror in the foyer!
THE LIVING ROOM
The Living Room is where the first tree went in The Seasonal Home. I knew any tree I displayed would need to be elevated (out-of-the-way) to keep our little pup safe, so the unique & inexpensive idea I came up with is a Drum Stand tree base! The total cost to make this was around $20 and here’s the DIY instructions:
CLICK on photo to better view the instruction details
I chose a color theme of black & gold along with frosty and musical (under the stars) accents. If you look closely (at the tree below), you’ll see that I recycled the black branches from Halloween 2012, adding them into the tree for texture. I also reused 2 silver drums from Christmas 2010 by cutting & adding a length of the black & gold reindeer gift wrap (used on the drum tree stand) and gold cord (to hide the gift wrap edge) so they coordinate, when added to the tree.
It’s so hard to find large, quality glass ornaments in black! Check out Seasons on the Web link (right hand column of this blog) to check out their huge ornament inventory!
And here’s the rest of the room!
HELPFUL HINT: boxes, gift wrapped in coordinating paper & ribbon make an inexpensive room accent for the holidays!
THE FAMILY ROOM
In the Family Room, I couldn’t place too many decorations or snow on The Seasonal Home hearth because of our new pup and her thieving ways. And because she thinks she can carry away just about ANYTHING in her tiny mouth, I had to be sure I used something too large for her to consider… these lighted, faux gifts appear to be just perfect… so far! (lol)
And here’s the rest of the Family Room
I’m starting to notice a “puppy” theme in this room (LOL)
And I simply can’t let a Christmas go by without highlighting a series of my ornaments, like these (Hallmark Windows Series) that feature children peeking into shop windows at Christmas time. A cabinet or sideboard (with shelves) is the perfect place to display a collection. HELPFUL HINT: If you also have a collection of ornaments, consider trying something new by displaying them together (for maximum impact) instead of spreading them around the tree… it’s incredibly fun!
Here’s some close-ups so you can see how much fun adding small details (like snow & trees) can create!
THE KITCHEN
Another Christmas tree to be elevated! And, of course, it should also make sense with the theme I chose – Snowmen and Holiday Sweets to create the Frosty Sweet Shop!
I was inspired by a $500 Cupcake (themed) tree stand I saw at my holiday wholesaler. Although it was beautiful, the cost to make mine was only $10.
Here’s the directions:
Once you place the Cupcake liner around your basket, it’s time to add frosting. Lightly spray-paint polyester fiber fill (comes in a plastic bag at craft & discount box stores) and shape like frosting dripping over the edge of the Cupcake liner. I used a light pink color of spray paint. Finally, add small (matte or glitter-finish) ornaments to the fiber fill to create a look of candy sprinkles on the frosting. I found a pick of several glittered ornaments at Target for only $2.00 and because each one was already on a piece of wire, it was easy to slip them into the fiber fill batting, individually.
And here’s the finished look –
The rest of the room –
HELPFUL HINT: Large foam snowflakes (Dollar Tree) make great winter-theme placemats!
HELPFUL HINT: the 6″ plastic snowflakes I found at the Dollar Tree this year fit perfectly into the chandelier to create instant ice-bling!
Light and motion collectible house by Department 56
KIRKLAND’S has wonderful holiday art… this one lights up!
HELPFUL HINT: Use holiday cards to help you decorate inexpensively! I used 3 inside the openings of this photo display & coordinated a little scene below them.
You’ll find even more details and decorations in this year’s HOLIDAY TOUR on YouTube… here’s the link:
[CLICK ON ANY PHOTO,for a more detailed & larger view]
This weekend was our Annual “WELCOME FALL!” Picnic at The Seasonal Home… a celebration that I started, several years ago, with the daughters of one of my best friends (who happens to live next door). The first year, it was simply my way of giving her a little parent-break, but has now become an annual tradition. Once my boys were grown, I really missed the creativity of doing fun things like this so now, I’m creating new memories with my 2 sweet neighbors – Emme and Gretta.
This celebration is our way of welcoming in the Autumnal Equinox (a/k/a Fall) and even though it is usually still hot outside, a good fan and our imaginations help us pretend that it’s breezy & cool. Here’s a peek at some of our fun, in case you want to start this tradition yourself.
We always have our picnic first. This year, we decided to make grilled cheese sandwiches (cut into pumpkins), homemade sweet potato fries (Sandra Lee’s recipe, Food Network), and diced apples over graham cracker crumbs with a drizzle of hot caramel (an idea we thought up ourselves). P.S. If you ever want to see a young child have fun, give them some graham crackers in a plastic bag and show them how to turn them into crumbs, using a wooden rolling pin – hilarious!
For dessert, we made a healthier chocolate muffin from a new mix called “Simple Mornings”. They served as our cupcakes, topped with a little homemade cream cheese frosting (Food Network recipe), sprinkles and a small, candy pumpkin.
We had SO much fun making all the food… together!
Of course, we decorated for our picnic too! I found over-sized, felt, fall leaves (in 3 different colors) at The Dollar Tree and we simply used a piece of fishing line to hang them from the pergola beams.
They looked so pretty (moving), when a breeze finally kicked up! Check it out in this short YouTube video I made:
With the addition of a few scarecrows, pumpkins and fall flowers, we were ready to enjoy our “WELCOME FALL” picnic.
And funny enough, every year, we seem to be visited by a representative of Mother Nature. Last year, it was a caterpillar and this year, we enjoyed the company of a beautiful & HUGE Swallowtail Butterfly, who really liked the flowers in my up-cycled wheelbarrow Fairy Garden.
And he didn’t even seem to mind that I was following him around with my camera.
The girls were really hoping he would land on their fingers.
Once he fluttered off, it was time for lunch!
Uhhh… please ignore the well done sweet potato fries – they were the unfortunate casualty of our hectic kitchen preparation.
Once we saw that a few of our fries were slightly overcooked, the girls tried to make lemonade out of lemons by suggesting that “maybe adding some ketchup will help”…. soooooo sweet!
After we ate, it was time for crafts and games! We usually have an apple bobbing contest, but little Gretta is about to lose a front tooth, so we decided to try some new things this year.
So, first up…. a little painting of face masks.
And ta-dum…. the cute, personalized results. Hey, that looks a awful lot like my hair!!
Next, a competitive game of Halloween B-I-N-G-O. Check out the concentration on their faces (LOL).
And last, but not least…. a game of PIN THE HAT ON THEWITCH.
I’m not sure who was the best spinner or worst pin-er, but when you’re having fun, the results don’t really matter.
First up was Gretta….
Hmmm… close! Then, it was Emme’s turn.
In the end, it really didn’t matter who won because I had gathered a few inexpensive, special treats, as a surprise for both of the girls.
I found a cute $1.00 pumpkin box (Wal mart) to place them all in and added a “Happy 1st Day of Fall” note to each.
Once we headed back inside (we had enjoyed the Florida heat & humidity quite enough, thank you very much!), the girls had fun opening their goodie boxes.
Two of their favorite things were the Spider rings, modeled here by Emme –
and a small bag of the newest M & M flavor “Candy Corn White Chocolate”…. YUM!
In the end, we all agreed we had tons of fun and that cupcakes taste even better in air-conditioned comfort! (LOL)
I hope we inspired you to consider starting your own “Welcome Fall Picnic” tradition. 🙂
On my Facebook Community Page, I run contests (almost every season) to thank everyone who “LIKES” my page. And it’s that time again! To enter… simply head over to “The Seasonal Home Facebook Community Page” (see right hand column of this blog site for the link) and leave a comment on one of this week’s posts (June 12 – 17, 2011).
The prize this time is a FUN set of Patriotic Picnic Goodies! Everything is non-breakable, so they’re safe for outdoor use. The set includes: a large, wavy-edge serving bowl, 4 star-shaped dessert/salad dishes, 24 WILTON Patriotic wavy-edge Cupcake Baking Cups, 12 WILTON Fun Pix Patriotic Cupcake or Food Metallic Sprays, 24 PIER ONE Metallic Patriotic Cupcake or Food Pinwheels, a Patriotic Kitchen/Grill Hand Towel with an adorable pin-striped cotton trim. This Contest ends at midnight (EST) on June 17, 2011. No purchase necessary and as always, I cover the postage to ship it to our lucky winner.
Good Luck and I’d like to “WELCOME” all of our new Facebook Community Page Members, in advance!
Looking for a FUN, new “birthday” celebration product? I just found one in my local grocery store… sparkler candles! You can use them on a cake, stick them in a bowl of ice cream, on cupcakes, etc. The package recommends “outdoor” use, so a picnic table celebration might be best. What a cool way to light-up someone’s birthday! As always, it’s recommended that you follow all safety precautions and of course, this product is not intended to be handled by children. But, in the right hands… how fun is this!!!
Check out my book (click on book cover) for more FUN, Creative and Unique “Birthday” Celebration Ideas!
Close-up view
Welcome to… the ART of decorating around the JOY of celebrating!™
Also… I’d love to hear from you!
Feel free to email me with any question, comment, suggestion you may have or with your request to have one of your ideas spotlighted - info@creativefamilytraditions.com
If you show off our creativity, please let them know you found it @ www.TheSeasonalHome.com -
so they can visit us to enjoy even MORE of our creativity! :-)
Click here to watch my FREE VIDEOS and enjoy some musical, holiday spirit:


s")


