Creative, Re-purposed Decorations for Valentine’s Day

[As always, click on any photo to view it larger]

Call me creative or just plain lazy (LOL)….  but this year, I kept up a few of my Christmas decorations and re-purposed them, with a “Valentine” look.

Remember this pretty garlandfoyer_full_2_s

Once I removed the ribbon, “Merry Christmas” sign and the tabletop decorations, I noticed how beautiful and wintry the greenery looked, so I just added some glittered red hearts (wall hangings cut-apart from the dollar section of Target), red velvet heart picks from The Dollar Store and my “smooch” stickers (purchased a few years ago).

Total cost to take it from Christmas to Valentine’s Day: $3.00

s)foyer

And remember this tree?kitchen_tree_sjpg

I replaced the hanging ornaments (on the curtain rod) with a simple valance I sewed, using $3.00 worth of fabric from Wal-mart and added a $3.00 felt heart garland from Target to trim it out.

The tree ornaments are 3-piece, glittered Valentine wall hangings (from the dollar section of Target) that I cut apart and used alongside cardboard hearts (removed from a $4.00 Walgreen’s wreath).  I added one new thing that softened the look of the white tree and made a wonderful garland – inexpensive light pink feather boas!  For the base, I made a pink cupcake liner (from poster board) to replace the blue (Christmas) one and exchanged the glittered ornaments, tucked in the pink frosting (spray painted polyester batting) with sprinkles, which I made from leftover poster board and paper.  The Christmas tree was bright and happy, whereas the Valentine’s Day tree is soft and sweet!

s_tree

I’ll be hosting a Valentine themed meeting next month, so I test-drove the table cover, dishes and chair decorations to see how they’ll look too.  I’m loving this lush, pink color!  And by the way, the chair decorations are nothing more than another glittered “Conversation Heart” wall hanging I also found in the dollar section at Target and tied on the back of the chair with an inexpensive piece of ribbon.

s_kitchen full_w chair backs

It was fun to fill my cabinets with Valentine goodies too and I re-purposed some Christmas decorations there… can you spot them?

s_cab left  s_cab rt

Remember this cookie tree from Christmascookie tree

I covered the star (on the top) with a couple of the cardboard hearts and of course, placing it next to a couple of Valentine cupcakes creates an instant Valentine’s Day treat!

s_cookie n cupcake display

Remember this cake plate with a red bow, from Christmas? foyer_santa_s

It’s just as cute under a Department 56 Valentine house!  s_cab left_bottom

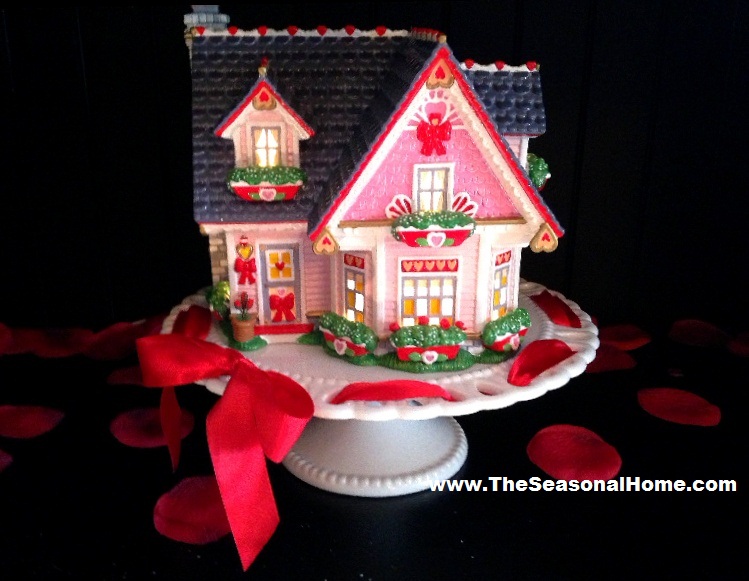
I use my apothecary jars year round, including Christmas.  I changed the candy, in several of them to Conversation Hearts (for Valentine’s Day) but kept the pastel jelly beans in one because the colors were perfect!

s_conv hrts  s_cab rt_top

Here’s an idea you might want to try – use apothecary jars as frames by adding a few Conversation Hearts and tucking your photos or vintage Valentine Cards inside.  You could display photos of you and your sweetie or your kids/grandkids.  It’s just a different way to display photos or other keepsakes without purchasing a separate & costly Valentine’s Day frame.  And hey… it makes a real conversation piece too!

s_cab rt_bottom

Stay tuned for a Shabby Chic idea for Valentine’s Day (blog post) next, coming up in a couple of days!

HAPPY VALENTINE’S DAY!

Enjoy the Creativity…

EILEEN

How to make – Large, faux CHRISTMAS CANDY Decorations

Every year, pool owners purchase these inexpensive (apx. $1.00 each) 5-foot, foam “noodle” floats.  Eventually, they fade and are, many times, thrown out.   As always, I LOVE to think of ways to recycle and repurpose things (instead of adding to the landfill) and came up with a creative idea, using  retired pool noodles.  Of course, you can also buy them new (on clearance – post summer!) to make this project too.

My vision was to create several large, faux candies (for holiday decorating), mainly because they’re lightweight and won’t weigh down (tree, wreath & garland) greenery … PLUS, they’re inexpensive!

ONE

Begin by deciding approximately how long you would like to make each piece of candy (I chose 9″) and divide that number into the total length of the pool noodle to determine how many you’ll be able to cut from each one.  Mark (that individual measurement) along the length of the pool noodle (using a black marker) and then, carefully cut (using a knife) through the foam at each marking, on a safe surface.  I ended up with six (6) lengths, apx. 9″ each.

TWO

Choose a gift wrap, scrapbook or tissue paper to cover them with and cut pieces large enough to wrap each (cut) foam piece and wide enough so you have extra to fold down at each end of the foam piece (to hide the end of the foam).

To create a neat closure, fold over one end (of the length) and place one foam piece, in the center, at the other end.

Before you roll the foam piece up in the paper, add 3 pieces of double-sided tape along the length of the fold, half on the folded paper and half on the underneath (blank) side of the paper.

Now, when you roll up the foam piece, the tape will automatically secure the paper (closed).  Unless you want to, don’t worry if the pattern doesn’t match up perfectly because that will be the “back side” of your ornament.

Fold down the paper on each end and use a piece of regular scotch tape to secure it.


THREE

Repeat the paper cutting process (above), but this time using clear, plastic basket wrap.  This time, however, make sure the length is even longer (by 6″).

Place your gift-wrapped foam length in the center of the plastic wrap, at one end of the width.  Before you roll it up, once again, add 3 small pieces of double-sided tape on the other end (of the width) so the plastic wrap will automatically close, after rolling up the foam candy in it.  Also, try to line up the 2 closures (paper & plastic wrap) and that can be the back side of your ornament.

FOUR

Cut two (2) lengths of ribbon, using one to tie each end (of the plastic wrap) closed, displaying the bow on the front/top side of the ornament.

When you’re done, you’ll have inexpensive, lightweight Christmas candy decorations for approximately 50 cents each.  I found that mine tucked into my holiday greenery easily without the aid of a hanger.  But, if you’re using them to decorate garland, add a length of fishing line (tying it to each end, before adding your ribbon) as an ornament hanger.

I’m excited to share with you how I used mine in one of The Seasonal Home 2012 Christmas designs this year… so stay tuned… COMING SOON! 🙂

And don’t forget to consider this idea for other holidays!

ENJOY THE CREATIVITY!

Eileen

Recycling Halloween Candy

Halloween is almost here (it’s tomorrow, in fact!).  And if things go according to plan, the kids will gather more candy than they could possibly should eat and we’ll have candy leftovers WE shouldn’t eat (LOL), so here’s a few ideas of OTHER creative things you can do with that sweet stash to spread out the sugar rush:

Create a Craft Project!

The next time the kids or grand kids get bored, pull out the (by now, stale) candy, unwrap it and decoupage a light switch or photo frame, with the wrappers, to create unique room accents!

photo courtesy of Martha Stewart

photo courtesy of etsy.com

Turn it into a gift!

The holidays are coming, so you’ll probably need some edible gifts for neighbors, friends, etc.  Click HERE to check out a wonderful “Leftover Halloween Candy Bark” recipe I found on a creative food blog (www.browneyedbaker.com).  What a great way to recycle the candy into something useful!

Create a future treat!

How about using some of the candy to create delightful desserts for the next holiday…. Thanksgiving!

Satisfy a soldier’s sweet tooth!

A nationwide partnership between dentists and Operation Gratitude, a military support organization, sent more than 61 tons of candy to troops overseas last year. Here’s how it works: Dentists buy back candy from kids, then send it to Operation Gratitude, which distributes it to military bases. There are more than two dozen participating dentists in the Chicago area. Visit halloweencandybuyback.com and enter your ZIP code to find one near you!

Keep some for Christmas Decorating!

Candy is exactly what you need to dress up a Gingerbread house or to fill up Apothecary Jars to create some festive holiday decor in your home this Christmas.

photo courtesy of All You Magazine

Enjoy the Creativity!

EILEEN

Using Natural Products to Create a Summer Decoration or Gift

While cruising the offerings at some of my favorite local stores (The Stable in Lake Alfred, FL & The Pottery Barn), it’s hard not to notice how adding natural textures, like rope or twine, to a (large or small) candle holder creates an instant summer look.  So, check out the great products I found OR dig out your glue gun to re-purpose a candle holder, you already have, by adding some instant texture… what a great (inexpensive) way to gift yourself or someone else this summer!

And while we’re on the subject of using natural textures to create something special, check out how pairing a little burlap and twine makes a great gift wrap for a bottle of wine…  the perfect summer hostess gift!

ENJOY THE CREATIVITY!

Eileen

Secret Fairy Garden in an Upcycled Wheelbarrow

[As always, click on any photo to view it larger]

Nothing renders a trusty wheelbarrow “useless” faster than a broken handle.  And as you can see, The Seasonal Home is now the proud owner of one. (LOL)


My first instinct was to head to the DIY store to purchase a new handle, but let me be the first to tell you that they are only sold in pairs and are super expensive!  And as you can see (in the photos below), there is only a $20 difference between a pair of handles & a brand new wheelbarrow.  So, I decided to up-cycle my ol’ one-armed wheelbarrow and purchase a new one for yard duty.


First, I cleaned the wheelbarrow and let it dry completely.


Next, I spray painted it (using a spray paint that doesn’t require priming and adheres to most surfaces) to coordinate with the other accessories in my yard (chandelier, bird bath & outdoor planters) that I’ve also painted bright blue (check out my older garden posts to see those ideas).

It needed more color, so I accented it with light green, using a stencil to create the design, outlining the design elements (using a black marker) to make them pop.


Once it was painted, I looked for the perfect spot to place it, in my garden, and found an empty area next to an orange tree I recently planted.  Also, I’ll place it so the side with the missing handle faces the fence (wow!  need to re-stain that soon…lol).  So, the wheelbarrow will be perfect there, because I can move it once my tree grows large enough to fill in the area.

I knew if I filled the wheelbarrow with some soil and plants, I would have instant height, volume & color, so this was the perfect spot!  I was so excited that my wounded wheelbarrow warrior would accomplish 3 things:  bring my bright blue accent color to another garden spot, fill a hole in my garden bed and create height, becoming a triple problem-solver.

But, I had a 4th idea – to also tuck in a secret fairy garden!  I already had a little fairy, but she needed a cottage.  You can find fairy houses in stores, but they are usually pricey.  Luckily, I found this bird house in the clearance at Home Goods for only $12 and with a small renovation, it will be just as cute.


I turned the bird house into a fairy cottage, by gluing a doll house door (using a piece of gift wrap for a curtain) to the front.  Before I glued it to the bird house, I painted it, added an address and (snap) doorbell.  The front door step is a length of balsa wood (that I also painted).  Of course, any respectful fairy would busy herself by collecting trinkets, so I glued a few of those to the front door step also.

To protect my fairy cottage from in-climate outdoor weather, I coated it with urethane and glued it to a stand, so it wouldn’t touch the dirt.

With a few more accessories in place, my up-cycled wheelbarrow now has a secret…. a little fairy and her sweet cottage.

Click on photo to view larger detail

And now, I have a brand new, gorgeous focal point in my garden, filling up a (formerly) open space with color, texture and whimsy.  This would be a great summer project to create with children of any age.  Suggestion: consider adding a couple of new accessories to match the changing seasons (mini pumpkins/hay bales, basket of eggs, tiny Christmas tree, etc.) to keep the fun fresh, which would also make a great seasonal tradition you can all look forward to!

And now, for a touch of  “FALL” in the Fairy’s Garden:

Enjoy the Creativity!

Eileen

P.S.  Here are a few other “everyday” items you might consider re-purposing into a garden planter before you discard them:


Using Paper products to help decorate your fireplace for Spring & Easter

In today’s marketplace, paper comes in so many forms and is a perfect fit for my creative, yet budget-conscious, brain.  So, if you’re looking for new ways to transform your fireplace from Winter to Spring (and Easter), read on because I think you’ll like the creative way I found to incorporate 3 different paper products to create 2 new designs.

IDEA #1

For the first fireplace look, SCRAPBOOK PAPER helped me create an “Art Comes Alive” look above The Seasonal Home’s family room mantel.

Tracing around a wood butterfly shape (Hobby Lobby – 50 cents) created the large butterflies and a cookie cutter (I already owned) helped me create the smaller butterflies.  Because I have a hard surface surrounding my fireplace, I was able to use dots of hot glue, from a low-melt glue gun, to attach my butterflies to this surface.  You could also use “Tack It” (office supply dept.) or COMMAND strips to attach them to more delicate surfaces.

I found the vintage frame at a thrift store ($3), lightly spray painted it white and placed it on the mantel.  [NOTE: Typically, these are reasonable if they don’t have artwork in them].  The yellow clay pots are a recycle from a look I created last Easter (https://seasonalhome.wordpress.com/2011/03/07/yellow-at-easter-its-not-just-for-chicks-anymore/ )… so, “zero” dollars.   The aqua, polka-dotted bunnies ($3.99 each) and the yellow, polka-dotted candles ($4.99 each) are both from Old Time Pottery.  The yellow vine came from a clearance section of one of my favorite local stores ($6.75) as did the aqua birdie ($1.99).  I picked up the yellow gingham ribbon (see clay pot trim & mantel inset) at Joann’s, etc.  for only $1.75 with a 50% off coupon and the large aqua flower at Hobby Lobby for $1.99.  If you’re familiar with my blog, you’ll recognize my white candlesticks, bird nests and eggs because they roam somewhere different, every year, in The Seasonal Home.

For Part #2 of this look, I wanted to transition my fireplace hearth from Winter to Spring.  In keeping with my nature look, I thought it would be a great idea to make a cushion, flanked by some green topiaries from around the house, to create a park bench feel and also, add additional seating for my Spring and Easter guests.  The aqua gingham fabric, buttons, yellow bias tape & rope insert as well as the 2 bed pillows – $15.00 (Walmart).  So, this entire idea cost $47 to create and I love the fresh look!

IDEA #2

For the second look, I used two different paper products – Green, plaid Hallmark gift wrap (love this stuff because the lines on the opposite side make it easy to cut straight! lol) and white poster board (50 cents), both from Walmart ($4).  I taped a large piece of gift wrap to the back wall & upper inset of the fireplace and removed the logs/grate, to replace it with Dept. 56 artificial grass ($14), edged out with artificial lettuce leaves, to create a base for my 2 sitting, Mom & baby bunnies and used fuzzy Christmas snowball ornaments for their tails.  Finally, I dotted the grass with a few small daisies and also sprinkled them on the mantel and around the large, white bunny cookie jar (sitting inside the cabbage plate) to create continuity. 

CLICK on any photo to enlarge

On the mantel, I used items you’ll also recognize from previous posts, including the wreath, which is the yellow & white daisy wreath from the post I shared above.  I simply added a few different colored flowers to it.   And of course, I simply cannot decorate for ANY holiday without filling up one of my apothecary jars.  This time I added a set of glittered Easter Eggs.

On the side table, you’ll recognize another one of my white candlesticks, on top of which I placed a small clay pot of pink daisies.  You can place SO many different things on top of candlesticks during different seasons, so I highly recommend investing in a set of these to help with your decorating.

This look would be hard to price out for you because I used many items I already had, but it turned out to be one of my favorite looks because it’s so bright & cheery!

Enjoy the Creativity & Happy Easter!

EILEEN

Early Valentine gift to Mother Nature

[click on photos, for larger view]

During Christmas, I purchased a small, inexpensive Frazier Fir tree to place inside a beautiful winter sled-tree stand given to me by one of my clients.  I loved the idea of having a fresh tree on The Seasonal Home’s front porch (close to the front door) so I can enjoy a wonderful pine smell each time I pass by.

It just so happened that I placed the tree in front of the kitchen window and one day, while doing the dishes, I noticed a sweet bird, who landed in my fir tree to rest.  I would have been thrilled if my feathered visitor had stayed long enough for me to take a photo, but as quick as it landed… it was gone.  I immediately started thinking about ways I could encourage more birds to visit the tree (it’s just too wonderful to recycle yet!), but it wasn’t until I was about to throw out a stale loaf of bread that the solution came to me… fill my tree with welcome winter bird treats!

Even though I’m still filtering my way through organizing holiday decorations, my thoughts are already heading towards St. Valentine’s Day.  And based on the huge amount of visitors, to my site, who are searching for Valentine, St. Patrick’s Day & Easter ideas, I must not be alone in that thought process (lol)!  Anyway, those thoughts gave me the idea to pull out my Valentine cookie cutter and use it to create several winter birdie (treat) ornaments to hang on my tree.

So, after gathering my jar of peanut butter, a roll of thin ribbon, my container of bird seed and the loaf of stale bread, I was ready to go into production.  First, I used my cookie cutter to create heart-shaped pieces of bread.  Next, I spread peanut butter on one side (of each piece) and using a toothpick, poked a hole in the center of the top/middle of each side of the heart.  Now, it was time to feed the ribbon through the 2 holes and tie a knot.  (HINT): I found that the bread dries out quickly, so it would be best to create the 2 holes & feed the ribbon through, as soon as you’ve spread the peanut butter.  The last step is to dip the side of the bread with peanut butter on it into a plate of bird seed and your ornaments are complete and ready to hang!

I hope lots of feathered friends visit my tree of winter treats and allow me the privilege of photographing their beauty, in exchange.


Enjoy the Creativity!

Eileen

Recycle a Furniture Castoff into a Creative Potting Bench

This project turned out to be one of my favorites!   A month ago, I potted some veggies and created a space for them, on the side of my house.  As I was running between my garage and vegetable garden (to bring tools, fertilizer, potting soil, pruners and gloves to the garden, as needed), I realized how nice it would be to have a potting bench with some storage.   I also knew that it was not a project I could build myself and didn’t feel it was so necessary to spend considerable money on it either.  So, I went back to my love of recycling and repurposing and hit the garage sales, one fine Saturday.  As luck would have it, I struck gold my first time out and found an older IKEA desk top for only $4.00.

It had a work surface and plenty of storage, including dry storage (in the form of a cubby with a door), which I knew would be the perfect spot to store my garden gloves, to keep them out of the weather.

STEP #1 – a light sanding with a fine grade of sand paper, making sure I hit all surfaces, corners and crevices!

STEP #2 – remove the dust created by sanding with a slightly damp cloth.

STEP #3 – I chose a green, semi-gloss acrylic paint so my potting & storage bench would blend into the background.  However, I also gave it a sense of fun by free-painting some flowers, fauna and garden creatures to dress it up and express my creativity, using some leftover bottles of acrylic craft paint I had.  (paint used – apx. $7.00)    I have to say this was my favorite part of the project.  Not only did I enjoy the zen-ness while painting on my own, but when the adorable children I live next to caught a glimpse of what I was doing, they joined in and added a little of their own artistry.  It didn’t matter that we ended up with a hot pink & orange flower or a blue butterfly because it was simply a fun day for all of us!

Here is the result of our creative art —

POTTING BENCH - Left Side

POTTING BENCH - Left Side

POTTING BENCH TOP

POTTING BENCH - Right Side

THE FINISHED PROJECT!

STEP #4 – Drill a small hole for an inexpensive (87 cents) pink ceramic, weatherproof knob for the cabinet door and seal the potting bench with INDOOR/OUTDOOR Helmsman Spar Urethane ($10) to protect my finished project from the weather and elements.  Because the cabinet is such an inexpensive piece of furniture, it’s made from compressed wood particle board with a laminate cover.  I think the weather will eventually take its toll on my sweet potting bench, but the clear satin sealant should buy me a couple of seasons at least, I hope!  PROJECT TOTAL -apx. $22.00.

The bench is so useful because it has already saved me many back & forth trips to the garage for garden tools and necessities.  Now, they are all close by and at hand and SOOOO convenient!