28 Jan 2013
by seasonalhome
in VALENTINE'S Day
Tags: ANgel, Be Mine, bird, candle, Cherub, Decor, Decorating, Decorating Idea, Decoration, Garland, Heart, Love, mantel, Mantle, Rose, rose petals, Roses, sign, ST. VAlentine's DAy, Sweetheart, Valentine, VALENTINE'S Day, Wreath
[As always, click on any photo to view it larger]
Time to decorate the fireplace for Valentine’s Day!
It can look so much nicer to hang something large and Valentine themed over (and under) a mantel full of decorations because it enlarges the look of your festive display. But, one problem is that Valentine themed art is very hard to find and can be expensive so why not create your own?
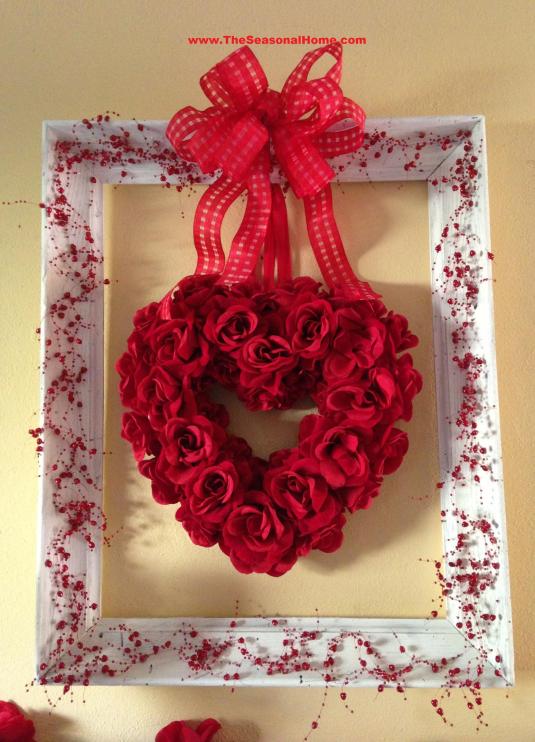
Step 1 – search your local thrift store for a wooden frame.
A wooden frame can be any color because it’s easy to paint. I found this one last year (it was a dirty, dusty brown color) and painted it white to create a shabby chic look to use in some Spring themed decor.
For Valentine’s Day, I added a red, beaded garland (using spots of hot glue, here & there to secure it) to the frame temporarily and displayed a lightweight wreath of roses from a bow and ribbon in the center of the open frame. Viola!
HELPFUL HINT: I hung the frame on an existing nail, but you could also attach the bow to the top of the frame and lean it against the wall.
Step 2 – “new-purpose” old decorations!
A common thread you will notice in my style of decorating is that I re-use (or “new-purpose”) decorations I already own and many times, for a different holiday! Do you remember the faux fern I used to border the snow under my Fairy themed Christmas tree a couple of years ago? Check out how nice it looks along the back of the mantel with last year’s Dollar Store roses and a $1.00/pkg. of pink, glittered hearts (Dollar Tree) tucked in. It serves as a beautiful backdrop to my sweet Cupid, 2 heart-shaped topiaries and faux rose petals on the mantel.
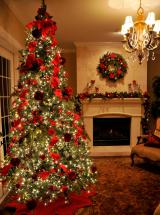
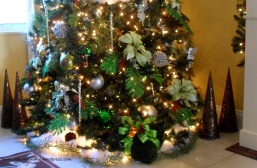
And just in case you were wondering how roses might look on a tree, for Christmas, check out the rose-themed tree I designed for a client.
Also, if you have a large Valentine sign (like this “BE MINE” from Home Goods), you can use it to decorate the front of a mantel, by removing the hanger and using “Tack-it” (temporary gummy adhesive) to secure it in place for the holiday. I just love how these 2 additions simply & inexpensively enlarged my Valentine’s Day mantel design.
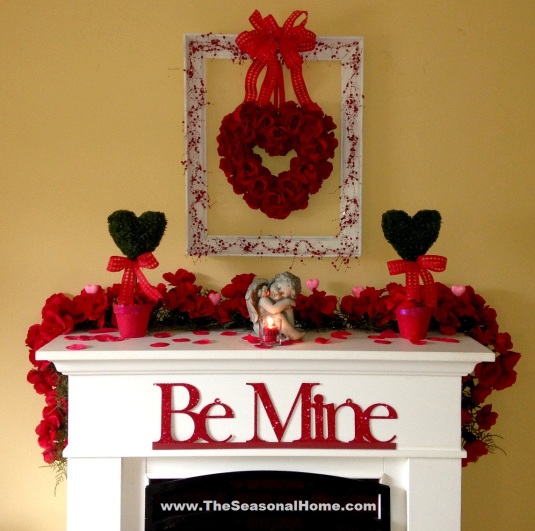
Step 3 – Don’t forget the details! I’ve had my sweet, little Angel for a long time, but this year (for the first time) I happened to notice that she had a tiny bird on her shoulder. Keeping in mind that LOVE comes in all shapes & sizes, I used my hot glue gun to add a small heart to his beak because… of course, he would bring her a little Valentine’s Day greeting!
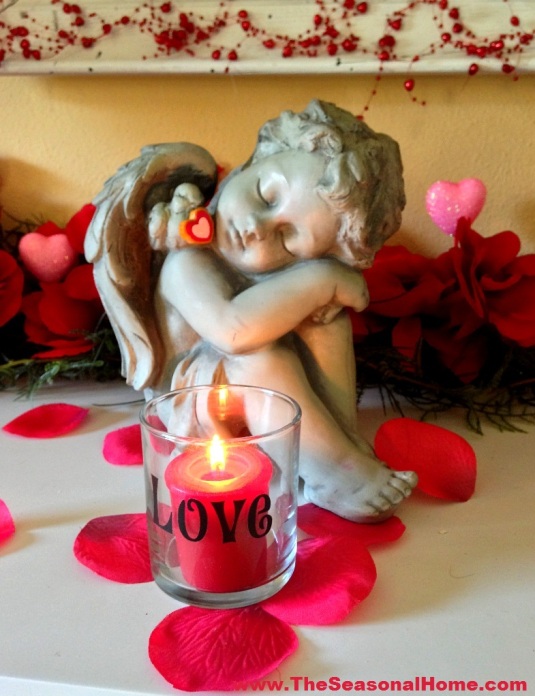
And if you like the little glass votive candle holder I placed in front of my Cherub, it was super easy to create! The glass votive is a plain one I purchased at the dollar store and added the word “LOVE” to, using my favorite self-adhesive vinyl letters (see office supply stores for these, in all fonts & sizes). You could also use a stencil and paint or etching cream to add a heartfelt sentiment. The candle was even a bargain because I purchased it after Christmas for pennies!
Enjoy the creativity, and…
HAPPY VALENTINE’S DAY!
Eileen
05 Apr 2012
by seasonalhome
in EASTER, SPRING!
Tags: bird, Bunny, Candy, Centerpiece, chicken salad, chocolate, chocolate nest, EASTER, ice, iced tea, mint, nest, sixlets candy, SPRING!, Table, Table decoration, Table scape, Table Setting


Spring is the perfect time to sneak in a relaxing, lunch with friends. Even if it’s main purpose is a planning meeting, it can still feel special if you pull out your pretty dishes & serve something easy and yummy. So today, I did just that… pulled out my light blue glassware and made some of my favorite recipes – Fruited Chicken Salad, which is a great Spring, Easter or Summer meal (I just added the “how to” to my RECIPE section) and for dessert, I used my old 10-minute (from start to finish) standard…. Oatmeal Fudgies…. and added some Six-lets candy in the center as they were cooling to create little chocolate bird nests (Fudgies recipe also in RECIPE section of this blog).
Two things to remember –
- If you have a pretty tablecloth that doesn’t cover your table, turn it so it lays in a diamond shape in the center of the table. Everyone will think you did it on purpose and

- Don’t forget to add a sprig of fresh mint to each glass of iced tea… it tastes SO refreshing and mint is very good for you!
Enjoy the Creativity!
Eileen
22 Mar 2012
by seasonalhome
in EASTER
Tags: bird, Bunny, Decor, Decorating, EASTER, Egg, Eggs, Flowers, front door, Front door decoration, hat, Idea, jumping bunny, nest, Peep, Pier 1, purple, SPRING!, Topiary


For my front door area, I was eager to reuse my black footed planters (to create a similar look to last years) for Easter (https://seasonalhome.wordpress.com/2011/03/28/3759/). But of course… it had to be a brand new look AND on a budget (translation – make it myself!) I also had a definite passion for purple this year and here’s my inspiration…. PURPLE PEEPS!
Before I could create the entire look, I first had to create a duplicate of my inspiration – the Marshmallow PEEP Bunny.
Using a 50% off coupon, I purchased a sheet of (apx.) 2″ x 12″ x 36″ white styrofoam, drew and cut a PEEP shape and used one of the discarded pieces (as a file) to create nice, clean edges on the finished product.

 Next, I painted my PEEP shape with a styrofoam-friendly brand of spray paint (Design Master) in lavender and then while damp, sprinkled it with a light coating of iridescent glitter for a sugary look. I also painted a bamboo wood dowel that I had cut in half and once that was dry, I inserted both pieces into the bottom of my PEEP shape, to create a stand. Chocolate brown (my name – not the manufacturer’s – but I thought that might be more helpful) acrylic paint and a small paint brush helped me create the face. Don’t they have the cutest faces?!! Couldn’t you picture several smaller versions of these in your front yard (maybe in different colors?)


Ok, back to the project (lol)…. I spray painted one of my footed, black planters white, and even reused a styrofoam circle (note the hole made by last year’s pvc). Then, I placed & gently pushed my PEEP’s bamboo legs into the styrofoam circle to secure it in the planter, slipped a purple-themed spring wreath over his head and added extra flowers to camouflage the styrofoam.


I added a bow to my bunny and placed my large, purple yard eggs and several other decorations around to bring my purple PEEP passion together, including using one of my outdoor greenery plants. And I love the mossy, jumping bunnies I found at Pier 1 this year. See what you think…


CLICK on any photo to view it larger.

Don’t forget to check out my entire EASTER category for even MORE creative ideas and stay tuned because I’ll be revisiting this craft in Easter 2013 in a fun & fabulous way…
Happy Easter!
Eileen
20 Mar 2012
by seasonalhome
in EASTER, SPRING!
Tags: apothecary, aqua, artificial grass, basket, bird, Bunny, butterflies, butterfly, candle, candlestick, Clay Pot, cushion, Decor, Decorate, Decorating, Dept. 56, EASTER, Eggs, fireplace, Flowers, Garden, Garland, Hallmark, Hobby Lobby, Idea, ideas, Joann's, lettuce, mantel, Mantle, nest, Old Time Pottery, pastel, pattern, picture frame, polka-dot, Recycle, Repurpose, ribbon, SPRING!, tails, Topiary, Walmart, Wreath, yellow
In today’s marketplace, paper comes in so many forms and is a perfect fit for my creative, yet budget-conscious, brain. So, if you’re looking for new ways to transform your fireplace from Winter to Spring (and Easter), read on because I think you’ll like the creative way I found to incorporate 3 different paper products to create 2 new designs.
IDEA #1

For the first fireplace look, SCRAPBOOK PAPER helped me create an “Art Comes Alive” look above The Seasonal Home’s family room mantel.
Tracing around a wood butterfly shape (Hobby Lobby – 50 cents) created the large butterflies and a cookie cutter (I already owned) helped me create the smaller butterflies. Because I have a hard surface surrounding my fireplace, I was able to use dots of hot glue, from a low-melt glue gun, to attach my butterflies to this surface. You could also use “Tack It” (office supply dept.) or COMMAND strips to attach them to more delicate surfaces.
I found the vintage frame at a thrift store ($3), lightly spray painted it white and placed it on the mantel. [NOTE: Typically, these are reasonable if they don’t have artwork in them]. The yellow clay pots are a recycle from a look I created last Easter (https://seasonalhome.wordpress.com/2011/03/07/yellow-at-easter-its-not-just-for-chicks-anymore/ )… so, “zero” dollars.  The aqua, polka-dotted bunnies ($3.99 each) and the yellow, polka-dotted candles ($4.99 each) are both from Old Time Pottery. The yellow vine came from a clearance section of one of my favorite local stores ($6.75) as did the aqua birdie ($1.99). I picked up the yellow gingham ribbon (see clay pot trim & mantel inset) at Joann’s, etc. for only $1.75 with a 50% off coupon and the large aqua flower at Hobby Lobby for $1.99. If you’re familiar with my blog, you’ll recognize my white candlesticks, bird nests and eggs because they roam somewhere different, every year, in The Seasonal Home.
 For Part #2 of this look, I wanted to transition my fireplace hearth from Winter to Spring. In keeping with my nature look, I thought it would be a great idea to make a cushion, flanked by some green topiaries from around the house, to create a park bench feel and also, add additional seating for my Spring and Easter guests. The aqua gingham fabric, buttons, yellow bias tape & rope insert as well as the 2 bed pillows – $15.00 (Walmart). So, this entire idea cost $47 to create and I love the fresh look!

IDEA #2
 For the second look, I used two different paper products – Green, plaid Hallmark gift wrap (love this stuff because the lines on the opposite side make it easy to cut straight! lol) and white poster board (50 cents), both from Walmart ($4). I taped a large piece of gift wrap to the back wall & upper inset of the fireplace and removed the logs/grate, to replace it with
  Dept. 56 artificial grass ($14), edged out with artificial lettuce leaves, to create a base for my 2 sitting, Mom & baby bunnies and used fuzzy Christmas snowball ornaments for their tails.
  Finally, I dotted the grass with a few small daisies and also sprinkled them on the mantel and around the large, white bunny cookie jar (sitting inside the cabbage plate) to create continuity.

CLICK on any photo to enlarge
On the mantel, I used items you’ll also recognize from previous posts, including the wreath, which is the yellow & white daisy wreath from the post I shared above. I simply added a few different colored flowers to it. And of course, I simply cannot decorate for ANY holiday without filling up one of my apothecary jars. This time I added a set of glittered Easter Eggs.
 On the side table, you’ll recognize another one of my white candlesticks, on top of which I placed a small clay pot of pink daisies. You can place SO many different things on top of candlesticks during different seasons, so I highly recommend investing in a set of these to help with your decorating.
This look would be hard to price out for you because I used many items I already had, but it turned out to be one of my favorite looks because it’s so bright & cheery!

Enjoy the Creativity & Happy Easter!
EILEEN
06 Jan 2012
by seasonalhome
in OUTDOOR IDEAS, VALENTINE'S Day
Tags: bird, bird feed, Birds, birdseed, Christmas Tree, feed the birds, food, Frazier Fir, meal, Nature, Ornament, peanut butter, Recycle, Repurpose, St. Valentine, ST. VAlentine's DAy, Valentine, Winter

[click on photos, for larger view]
During Christmas, I purchased a small, inexpensive Frazier Fir tree to place inside a beautiful winter sled-tree stand given to me by one of my clients. I loved the idea of having a fresh tree on The Seasonal Home’s front porch (close to the front door) so I can enjoy a wonderful pine smell each time I pass by.
It just so happened that I placed the tree in front of the kitchen window and one day, while doing the dishes, I noticed a sweet bird, who landed in my fir tree to rest. I would have been thrilled if my feathered visitor had stayed long enough for me to take a photo, but as quick as it landed… it was gone. I immediately started thinking about ways I could encourage more birds to visit the tree (it’s just too wonderful to recycle yet!), but it wasn’t until I was about to throw out a stale loaf of bread that the solution came to me… fill my tree with welcome winter bird treats!
Even though I’m still filtering my way through organizing holiday decorations, my thoughts are already heading towards St. Valentine’s Day. And based on the huge amount of visitors, to my site, who are searching for Valentine, St. Patrick’s Day & Easter ideas, I must not be alone in that thought process (lol)! Anyway, those thoughts gave me the idea to pull out my Valentine cookie cutter and use it to create several winter birdie (treat) ornaments to hang on my tree.
 So, after gathering my jar of peanut butter, a roll of thin ribbon, my container of bird seed and the loaf of stale bread, I was ready to go into production.
  First, I used my cookie cutter to create heart-shaped pieces of bread. Next, I spread peanut butter on one side (of each piece) and using a toothpick, poked a hole in the center of the top/middle of each side of the heart. Now, it was time to feed the ribbon through the 2 holes and tie a knot. (HINT): I found that the bread dries out quickly, so it would be best to create the 2 holes & feed the ribbon through, as soon as you’ve spread the peanut butter.
  The last step is to dip the side of the bread with peanut butter on it into a plate of bird seed and your ornaments are complete and ready to hang!
I hope lots of feathered friends visit my tree of winter treats and allow me the privilege of photographing their beauty, in exchange.

Enjoy the Creativity!
Eileen
19 Sep 2011
by seasonalhome
in HALLOWEEN (Thanksgiving & Fall too!)
Tags: apothecary jar, bird, Candy, candy corn, crow, Decorating Idea, Decoration, Decorations, fangs, fireplace, Ghosts, Halloween, hat, kitchen, licorice, mantel, Mantle, Pumpkins, rat, raven, Scary, spooky, test tubes, trick-or-treat, Witch
[Click on any photo for a larger view]
The Seasonal Home is decked out in it’s Halloween best and this year, it’s a little S-P-O-O-K-Y!
In my previous post, I showed you an inexpensive fireplace idea. I was inspired by the Crow (on the mantel), so I spread a few more around the room, beginning with my french doors. I f ound a generous package of 15 die-cut paper Crows at The Dollar Tree and with a little double-sided tape, I used them to create the old design trick of bringing the outside in.
This would also be a fun idea to use in front door sidelights or window.
And below, in The Seasonal Home’s built-in cabinet, I purchased a few Dollar Tree crows and dressed them up, for Halloween, in little witches hats…


If this look is too plain for you, consider what I tried next… also from the Dollar Tree!  Inspired by this idea (I found on the net), I decided to add a background to THE SEASONAL HOME’s built-in cabinet. Using newspaper to create a pattern
  , I drew a tree and used it as a pattern to create a spooky tree on 2 pieces of black poster board.
Here’s how this look turned out –

The foyer in THE SEASONAL HOME has been transformed into a Magic Potion and Spell conjuring laboratory…. 


And in the Living Room… some Fall and just a bit ‘o spooky –


THE SEASONAL HOME’s kitchen is ready for guests….


and the best part is…. I created a CANDY BAR this year! I thought this would be a fun treat for the adult guests, I’m entertaining this season, to once again enjoy a little (retro) Trick or Treating fun. I looked for the most inexpensive candies I could find (avoid a lot of chocolate to stay on budget) and used every jar I could find in my house and anyone elses (lol). I purchased one (1) package of “blank” Halloween labels at Michaels Craft Store for under $4 (with coupon), and using my computer – typed my label wording in a spooky font, lined things up and ran a test print. When I held the label up behind the piece of printer paper, I saw that my estimated font size was good & lined up perfectly, so I taped the label to the corner of my paper (using double-sided tape) and ran them through the printer, one at a time. Once I finished printing them all, I grabbed some twine from the garage, punched 2 holes in the top of each label, fed the twine through and knotted one end. Next, I pulled it tight around the neck of each jar, fed it through the 2nd hole, knotted it, cut off any excess and in no time, my jars were labeled for very little cost. Check out the finished product and help yourself! 🙂
Enjoy the Creativity!
Eileen

Grab a goodie bag to fill!


Who’s that standing in line for his share of the candy? Eeek!!!

28 Apr 2011
by seasonalhome
in SPRING!
Tags: Baby, bird, crane, Dad, Eggs, hatch, Mom, Nature, nest, pea hen, Peacock, visit, woods, wren, yard
[CLICK on any Photo,
to view an enlarged version]
All I can say is “WOW!” For some reason, we’ve been overrun by nature’s sweet creatures at The Seasonal Home.
First, a sweet Pea Hen visited. She was so shy and quickly retreated to the back yard when I entered the family room to find her about to enter my back door. Then, after hanging around in the yard, she was distracted by a passing Dragonfly, flapped her wings and lifted her huge body on to my roof. I was amazed at her athletic agility!


Next, a darling little brown Wren took up residence in my potting bench, made her nest and laid her eggs, but she wasn’t too happy when I tried to capture a quick photo of her (boy, if looks could kill! LOL) ~


But, when I checked on progress today, I noticed (through a zoom lens so as not to disturb her) that we have new chicks inching out, into the world ~

And finally (at least so far!) today, we received a visit from a family of cranes. Here’s Mom and Dad ~

Here’s their adorable, fuzzy, baby chick ~

As you can see, Mom and Dad never stray far from their sweet baby chick ~

04 Mar 2011
by seasonalhome
in EASTER, SPRING!
Tags: bird, birdbath, Birdcage, birdhouse, Birds, Decorating for Easter, Decorating for Spring, Decorating with Birds, EASTER, Easter Decorating, Easter Decorating Idea, Easter Flowers, Easter Garland, Garland, Spring Decorating, Spring Decorating Idea, Spring Design, spring flowers, Spring Garland, Spring Idea, SPRING!

[click on any photo to view an enlarged view & don’t forget to check out my many other ideas, under the Easter & Spring categories]
Old Man Winter has FINALLY left Florida and the birds have arrived! Every day, I have the pleasure of watching them out in my garden, splashing in the bird bath. They are so funny because when there’s not enough water, they just sit there as if to say “Hey Decorator Lady… you’re falling down on the job!”
I’m so happy when they choose a nearby tree to build their little nests too, but I feel absolutely privileged when I get to witness their babies arrive. Last year, I got lucky (while their Mom and Dad were out gathering food) and had my camera with me at the perfect time; I caught these new baby Cardinal’s chirping away, wondering where their food was. 
So, with my neighborhood full of fancy fliers, I was completely inspired to create my own version of nature’s aviary in my foyer for Spring this year. And here are a few photos, of that creativity, for you to enjoy:


HAPPY SPRING!

16 Apr 2009
by seasonalhome
in EASTER, MOTHER'S & FATHER'S DAY, SPRING!, SUMMER
Tags: beautiful garden wreath, beautiful wreath, beautiful wreath design, bird, birdhouse, Design, Easter Decorating, Easter Decorating Idea, Easter Decoration, Flowers, Garden Design, garden wreath, SPRING!, SUMMER, Wreath, wreath design
This idea is a wonderful wreath design for someone who is a bird lover because its centerpiece is a birdhouse. Check out the closeup view to see the tiny bird and eggs I added (with glue) to the bird house porch area, as the perfect accent to the birdhouse.
The base is a grapevine wreath, covered in silk ivy, fern, berries, preserved moss (found in plastic bags @ craft stores) & flowers. You can either wire your birdhouse inside the wreath (securing it from the the top & bottom, inside the wreath) or you can hang the birdhouse and wreath on separate nails, measuring the appropriate distance to ensure the birdhouse displays inside the wreath when both are hung.
I love to shop inexpensive home stores, like Old Time Pottery or Hobby Lobby for reasonably-priced bird houses. If you don’t have these stores near you, try www.PlowAndHearth.com or www.JacksonAndPerkins.com.

Birdhouse Wreath (full view) - Design/Image/Idea copyrighted by Creative Family Traditions. All rights reserved.

All photos/images/design ideas are the copyrighted property of Creative Families, LLC


