11 Feb 2013
by seasonalhome
in VALENTINE'S Day
Tags: Breakfast, Cocoa, cookie, Creative, dessert, Dinner, drink, drinks, food, fruit, Heart, heart-shaped, Ice Cream, ice cubes, ideas, pizza, recipe, recipes, salad, shapes, St. Valentine, ST. VAlentine's DAy, tomato, unique, Valentine, VALENTINE'S Day
I love creativity, especially when it comes to
food design ideas during the holidays!
The following are some creative ideas I found on the internet and Pinterest, for Valentine’s Day.
They inspired me so I’m sharing them with you…
Enjoy the Creativity!
EILEEN

Red ice cubes in a white drink, or…

white ice cubes in a red drink?
Either way, it’s heartfelt! LOL

Add marble before filling to create heart-shaped cupcakes

Cocoa with Marshmallow Heart –
cut from the large Kraft
s’mores marshmallows

courtesy of Bakarella

Cut slit in cookie prior to baking

Cinnamon Hearts made from slices of refrigated cinnamon rolls

courtesy of Land o Lakes

My kind of breakfast!


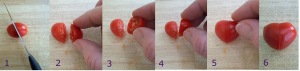
Directions for making heart-shaped tomato


These are mine!
Look for the simple, easy directions
under my RECIPE tab.


28 Jan 2013
by seasonalhome
in VALENTINE'S Day
Tags: ANgel, Be Mine, bird, candle, Cherub, Decor, Decorating, Decorating Idea, Decoration, Garland, Heart, Love, mantel, Mantle, Rose, rose petals, Roses, sign, ST. VAlentine's DAy, Sweetheart, Valentine, VALENTINE'S Day, Wreath
[As always, click on any photo to view it larger]
Time to decorate the fireplace for Valentine’s Day!
It can look so much nicer to hang something large and Valentine themed over (and under) a mantel full of decorations because it enlarges the look of your festive display. But, one problem is that Valentine themed art is very hard to find and can be expensive so why not create your own?
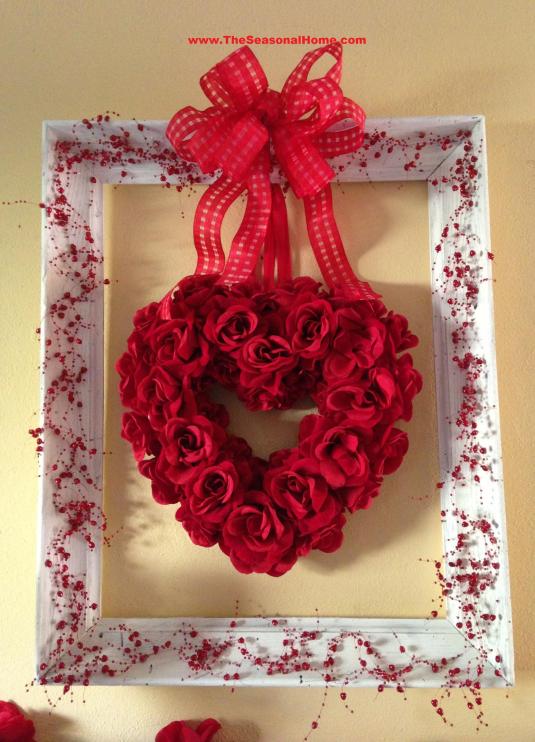
Step 1 – search your local thrift store for a wooden frame.
A wooden frame can be any color because it’s easy to paint. I found this one last year (it was a dirty, dusty brown color) and painted it white to create a shabby chic look to use in some Spring themed decor.
For Valentine’s Day, I added a red, beaded garland (using spots of hot glue, here & there to secure it) to the frame temporarily and displayed a lightweight wreath of roses from a bow and ribbon in the center of the open frame. Viola!
HELPFUL HINT: I hung the frame on an existing nail, but you could also attach the bow to the top of the frame and lean it against the wall.
Step 2 – “new-purpose” old decorations!
A common thread you will notice in my style of decorating is that I re-use (or “new-purpose”) decorations I already own and many times, for a different holiday! Do you remember the faux fern I used to border the snow under my Fairy themed Christmas tree a couple of years ago? Check out how nice it looks along the back of the mantel with last year’s Dollar Store roses and a $1.00/pkg. of pink, glittered hearts (Dollar Tree) tucked in. It serves as a beautiful backdrop to my sweet Cupid, 2 heart-shaped topiaries and faux rose petals on the mantel.

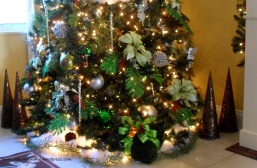
And just in case you were wondering how roses might look on a tree, for Christmas, check out the rose-themed tree I designed for a client.
Also, if you have a large Valentine sign (like this “BE MINE” from Home Goods), you can use it to decorate the front of a mantel, by removing the hanger and using “Tack-it” (temporary gummy adhesive) to secure it in place for the holiday. I just love how these 2 additions simply & inexpensively enlarged my Valentine’s Day mantel design.
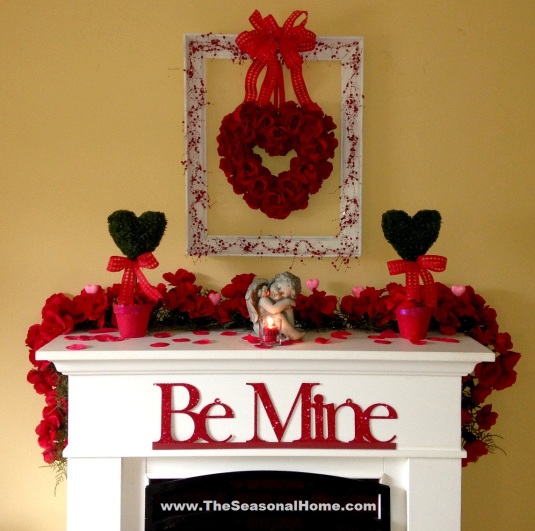
Step 3 – Don’t forget the details! I’ve had my sweet, little Angel for a long time, but this year (for the first time) I happened to notice that she had a tiny bird on her shoulder. Keeping in mind that LOVE comes in all shapes & sizes, I used my hot glue gun to add a small heart to his beak because… of course, he would bring her a little Valentine’s Day greeting!

And if you like the little glass votive candle holder I placed in front of my Cherub, it was super easy to create! The glass votive is a plain one I purchased at the dollar store and added the word “LOVE” to, using my favorite self-adhesive vinyl letters (see office supply stores for these, in all fonts & sizes). You could also use a stencil and paint or etching cream to add a heartfelt sentiment. The candle was even a bargain because I purchased it after Christmas for pennies!
Enjoy the creativity, and…
HAPPY VALENTINE’S DAY!
Eileen
16 Jan 2013
by seasonalhome
in VALENTINE'S Day
Tags: Auto, Automobile, Car, dishwasher, grill, happy, Heart, Hearts, Love, magnet, magnets, mood, refrigerator, ST. VAlentine's DAy, Valentine, Valentine's DAy decoration, Valentine's Day Wreath, Wreath
Valentine’s Day is coming soon and (I’ll bet you would have never guessed this, but…) I love to decorate my home for this holiday of hearts. 😉
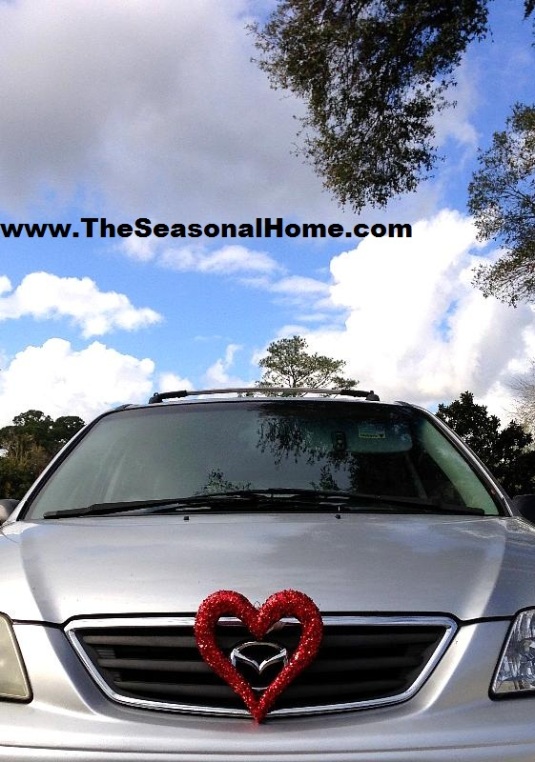
This year, I decided to spread the message of “LOVE” a little further, by adding a few hearts to my car. People add wreaths, ribbons & lights to their cars at Christmas time, so why not express a little JOY for Valentine’s Day too?
 It was easy & inexpensive to do. I found a glittery, weatherproof Valentine heart at Michael’s Crafts and added self-adhesive, felt pads to the back (to protect my car) and finally, zip-tied it to the front grill.
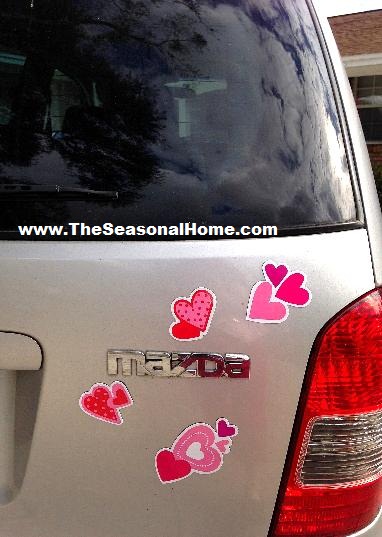
Next, I found some fun, inexpensive Valentine magnet sets. They’re marketed for display on a refrigerator or dishwasher, but I added a few to the back of my car. There are so many in the package, that I can share with neighbors, family & friends!
(If you are unable to find the magnet sets, I have a limited supply in my SHOP)
So, if you decide to spread a little “LOVE” around your own town, it won’t matter if the other drivers are in front of or behind you because, either way, they’ll enjoy your subtle message of “LOVE”… and I’ll bet it brightens their day too!!
Enjoy the Creativity!
EILEEN
26 Jan 2012
by seasonalhome
in VALENTINE'S Day
Tags: Cupid, Decor, Decorating, Decorations, Heart, Idea, Kiss, Love, ST. VAlentine's DAy, Tree, Valentine, VALENTINE'S Day, Wreath
[CLICK ON ANY PHOTO TO SEE A LARGER VIEW]
So many places are still chilly during the Valentine’s Day season, so here is a cozy spot to curl up with a book, magazine or on the lap of your sweetheart. And if you compare these photos to The Seasonal Home’s 2011 Christmas photos, you’ll notice that many Christmas decorations were re-purposed to create our Valentine’s Day scene, including:
White Christmas Tree, White Christmas Wreath. 3 Red Glitter Cones, and a Planter (tree is in) has been spray painted white.


HAPPY VALENTINE’S DAY!
Enjoy the Creativity!
Eileen
06 Jan 2012
by seasonalhome
in OUTDOOR IDEAS, VALENTINE'S Day
Tags: bird, bird feed, Birds, birdseed, Christmas Tree, feed the birds, food, Frazier Fir, meal, Nature, Ornament, peanut butter, Recycle, Repurpose, St. Valentine, ST. VAlentine's DAy, Valentine, Winter

[click on photos, for larger view]
During Christmas, I purchased a small, inexpensive Frazier Fir tree to place inside a beautiful winter sled-tree stand given to me by one of my clients. I loved the idea of having a fresh tree on The Seasonal Home’s front porch (close to the front door) so I can enjoy a wonderful pine smell each time I pass by.
It just so happened that I placed the tree in front of the kitchen window and one day, while doing the dishes, I noticed a sweet bird, who landed in my fir tree to rest. I would have been thrilled if my feathered visitor had stayed long enough for me to take a photo, but as quick as it landed… it was gone. I immediately started thinking about ways I could encourage more birds to visit the tree (it’s just too wonderful to recycle yet!), but it wasn’t until I was about to throw out a stale loaf of bread that the solution came to me… fill my tree with welcome winter bird treats!
Even though I’m still filtering my way through organizing holiday decorations, my thoughts are already heading towards St. Valentine’s Day. And based on the huge amount of visitors, to my site, who are searching for Valentine, St. Patrick’s Day & Easter ideas, I must not be alone in that thought process (lol)! Anyway, those thoughts gave me the idea to pull out my Valentine cookie cutter and use it to create several winter birdie (treat) ornaments to hang on my tree.
 So, after gathering my jar of peanut butter, a roll of thin ribbon, my container of bird seed and the loaf of stale bread, I was ready to go into production.
  First, I used my cookie cutter to create heart-shaped pieces of bread. Next, I spread peanut butter on one side (of each piece) and using a toothpick, poked a hole in the center of the top/middle of each side of the heart. Now, it was time to feed the ribbon through the 2 holes and tie a knot. (HINT): I found that the bread dries out quickly, so it would be best to create the 2 holes & feed the ribbon through, as soon as you’ve spread the peanut butter.
  The last step is to dip the side of the bread with peanut butter on it into a plate of bird seed and your ornaments are complete and ready to hang!
I hope lots of feathered friends visit my tree of winter treats and allow me the privilege of photographing their beauty, in exchange.

Enjoy the Creativity!
Eileen
12 Feb 2011
by seasonalhome
in VALENTINE'S Day
Tags: apothecary jar, Candy, holiday decoration, holiday table, ST. VAlentine's DAy, Valentine, VAlentine decorating idea, Valentine decoration, Valentine Wreath, VALENTINE'S Day, Valentine's Day Decorating Idea, Valentine's DAy decoration, Valentine's Day Wreath
[CLICK on any photo for a larger view & SEARCH “Apothecary Jar”, on my site (search window above), for even MORE ideas!]
 Filling Apothecary or Glass Jars, for the seasons & holidays, is easy, especially if you’re using large items, like faux squash (for Fall) or ornaments (for Christmas), etc. However, if you’re using a small filler, such as holiday candy (e.g. jelly beans, conversation hearts or candy corn), it can be quite pricey to completely fill up a 14″ tall jar like this one.
But, I have an easy way to fake-fill these larger jars! Simply roll-up poster board, thin cardboard or card stock into a cylinder-shape, measuring apx. 1/2″ less (in diameter) than the diameter of your Apothecary or Glass jar. Trim the height (of the poster board cylinder) to a height apx. 1″ below the top of your jar (without the lid). Stapling or using tape to hold your poster board dimensions will help it stay in place while you’re trying to accomplish the next step. Insert your poster board cylinder into the jar, also placing a (slightly smaller – in diameter) container in the center of the poster board cylinder (I used a tupperware container), which will keep the poster board or card stock from collapsing under the weight of the candy as you fill the open 1/2″ space between the jar and cardboard.
Now, all you have to purchase is apx. ONE bag of candy to fill the void between the poster board and the side of the jar.
Another way you can accomplish this is to find a cylinder vase that is 1/2″ less (in diameter) and no taller than your jar. If you are lucky enough to find that perfect of a fit, it is truly the best solution.

HAPPY VALENTINE’S DAY!
12 Feb 2011
by seasonalhome
in VALENTINE'S Day
Tags: ST. VAlentine's DAy, Valentine, VAlentine decorating idea, Valentine decoration, Valentine Wreath, VALENTINE'S Day, Valentine's Day Decorating Idea, Valentine's DAy decoration, Valentine's Day Wreath
[CLICK on any photo for a LARGER VIEW]
Often, I am invited by different groups of young Moms to speak about the importance of practicing family traditions (the subject of my book). This week, the group I spoke to also asked me to help them create a memorable Valentine’s Day wreath… one that would mean something, for years to come.
I purchased a 24″ foil, heart-shaped wreath and several small, silver frames (see bridal section of any craft or party store). In each of the frames, simply add family (and pet) photos and attach them to the wreath, using red pipe cleaners twisted around the frame stand and then, the wreath frame. You might also consider adding a favorite family “saying” if you want to add an additional frame. My favorite – “Family is a gift, wrapped in sweet memories and trimmed in LOVE” 
Then, I found “foamie” hearts that had a filigree edge, which allowed me to use fishing line to suspend it in the center of the wreath, by tying 4 pieces to the heart and also, to the wreath frame. I also purchased a box of “foamie” self-adhesive embellishments, including alpha letters, which we added to the “foamie” heart before hanging it into the center of the wreath. 
This “personalized” Valentine’s Day wreath turned out to be a very memorable design that can be updated (with new photos) as the years go by. I also suggested they could add some individually wrapped chocolate kisses (maybe one week’s worth) to the wreath (using small dabs of hot glue to lightly attach them), which can be removed, each day, as a Valentine’s Day countdown.
HAPPY VALENTINE’S DAY!

03 Feb 2011
by seasonalhome
in EASTER, SPRING!, VALENTINE'S Day
Tags: Chair Cone, Cones, EASTER, Easter Decorating Idea, Easter Decoration, Spring Decorating Idea, Spring Decoration, SPRING!, ST. VAlentine's DAy, Valentine, VALENTINE'S Day, VAlentine's, Valentine's Day Decorating Idea
[click on any photos for a larger view]
 On a recent shopping trip to Pier One, I spotted these adorable flower-filled, paper cones beautifully accenting the back of one of their gorgeous patio chairs.

I immediately fell in love with how fresh, pretty and decorative they were and could picture them on the back of a chair for – Valentine’s Day, a Spring Tea , Easter celebration or Summer get-together. I could also see different versions (see photos) of these at a kid’s Halloween party with take-home treats,  Thanksgiving as a vertical horn of plenty or with Fall flowers & tiny pumpkins and finally, at Christmas, full of peppermint or any other holiday goodies.

If these Pier 1 cuties match your look or decor, as well as your budget ($9.95 each), then by all means, head to Pier One and make your purchase! However, if you want this look, but want to customize it (for another season) or have too large of a family gathering to justify purchasing a large quantity, you can make a similar version by creating a pattern (found on the internet) or for an even quicker approach:
1. Gather sheets of pretty, patterned scrapbook or plain pastel card stock paper and punch 2 (either vertical or horizontal) holes in one corner.
2. Cut a length of think ribbon the length you will need to thread it through the punched holes and around your chair back, in a bow.
3 & 4. Roll your paper into a cone shape and staple it in the back (where it won’t show). Neatly trim off any excess paper that shows. [hint: if you take this cone shape apart afterward, you can then use it for a pattern].
5 & 6. Add any ribbon or other embellishments to the cone or simply trim it in a unique way around the top rim.
7. When done, fill it with a complimentary fresh or silk flower, shells, candy, specialty tea bags and a tea bag press, cosmetic samples… you name it… just use your imagination!
8. Use the threaded ribbon to attach your cone to the back of a chair, on a Christmas tree, from a chandelier… wherever your need is… here’s a review of the steps in photos:

31 Jan 2011
by seasonalhome
in VALENTINE'S Day
Tags: ST. VAlentine's DAy, Valentine decoration, VAlentine DEsign idea, Valentine garland, Valentine Mantel, valentine mantle, Valentine Wreath, VALENTINE'S Day, Valentine's Day Decorating Idea, Valentine's DAy decoration
Sometimes, I just want to keep my holiday decorations simple (I know… that’s hard to believe!) LOL It’s usually when I know family will be out-of-town or I’ll be MIA, a lot, from the house. So, when my home life is more minimal, my decorations reflect that as well. Below is an example of a couple of those simpler decorating ideas, for Valentine’s Day.
On my living room fireplace, all I added was a $10 wreath (www.biglots.com), a $5 felt heart garland (www.pierone.com) and a $5 candle & holder (www.homegoods.com). And in my foyer, I hung a sparkly pair of cupids – $5 (www.biglots.com) – from a white ribbon and placed some “Lip Smack” (removable) stickers $2 at http://www.target.com – on the surrounding mirror, with another $10 Big Lots wreath on the opposing wall. Simple, yet still pretty… HAPPY VALENTINE’S DAY!


FOYER

"LIP SMACK" Stickers (close-up)
25 Jan 2011
by seasonalhome
in VALENTINE'S Day
Tags: Outdoor Valentine, ST. VAlentine's DAy, Valentine, VAlentine decorating idea, Valentine decoration, VALENTINE'S Day, Valentine's DAy decoration
Those of you who are familiar with my blog may remember this Valentine yard decorating idea, which I posted a simpler version of a year ago (see Original Post under VALENTINE’S DAY Category, on right). But, this year, I had a few more candy canes to add into the mix, courtesy of a yard sale find. Yea! My display could grow & maybe cover the WHOLE garden bed eventually.
I was SO excited to add them to my Valentine yard display, but suddenly, I realized something was wrong when I took them out of their box…. the new candy canes were not only a little larger but are mostly clear with a thin red stripe, whereas the candy canes I already have are mostly red. (drat!) No matter how hard I tried, I could not come up with a good way to mix them in the yard, mainly because (as you will find, if you try this idea) the sets typically come with an odd number of canes so the last one has to connect to the first one to complete a heart shape.
Then, it dawned on me – why do they ALL have to go into the yard? So, I hung the new sets on my shutters and it created an even more interesting yard display. I simply had to share it (photos below) and hopefully, any new candy cane sets (I come across at future yard sales) will match my old ones so I can eventually fill the entire garden bed. Something to look forward to! 🙂

DAYTIME View

Getting Darker....

NIGHT View (bad photo... sorry)
Previous Older Entries


